Table of Contents
- 1. The Stovetop and Gadget Contenders: How They Performed
- 1.1. 1. The Microwave Method (The Convenient Failure)
- 1.2. 2. The Sous Vide Method (Too Much Wait for Little Reward)
- 1.3. 3. The Hot Skillet vs. Cold Skillet Approaches (The Stovetop Battle)
- 1.4. 4. The Ridge-Heavy Grill Pan (Inconsistent Heat)
- 1.5. 5. The Trendy Air Fryer (Great Crisp, Low Volume)
- 2. The Undisputed Winner: The 400°F Oven Method
- 2.1. Why the Oven Wins
- 2.2. Maximum Output with Minimal Mess
- 3. Pro Tips for Flawless Oven-Baked Results
- 4. Frequently Asked Questions
- 4.1. Should I bake bacon on a wire cooling rack inside the sheet pan?
- 4.2. Can I save the leftover bacon grease from the foil?
- 4.3. Do I need to flip the bacon halfway through baking in the oven?
- 4.4. Can I use parchment paper instead of aluminum foil?
- 4.5. How do I store and reheat leftover oven-baked bacon?
Oven-Baked Bacon: The Ultimate Cooking Method for Perfect Crunch
If you are a true bacon enthusiast, you already know that achieving breakfast perfection is not just a matter of flavor—it is entirely about texture. A truly magnificent strip of bacon requires uniformly golden, shatteringly crispy edges balanced with just enough tender chew in the center to hold its own on a breakfast sandwich or a classic BLT. However, consistently hitting that ideal textural sweet spot on the stovetop can feel like an elusive culinary challenge.
To solve this morning dilemma, culinary experts put seven distinct bacon-cooking techniques to the strict test. From lighting-fast shortcuts to high-tech low-and-slow experiments, every popular preparation style was evaluated for evenness, flavor retention, and structural crunch. While several traditional approaches fell short, one hands-off cooking method emerged as the undisputed champion for delivering flawless results every single time.
Oven-Baked Bacon: The Ultimate Cooking Method for Perfect Crunch

The Stovetop and Gadget Contenders: How They Performed
To find the absolute best way to prepare this breakfast staple, the testing covered a wide spectrum of kitchen techniques. Here is how the quick methods, high-tech appliances, and traditional skillet approaches stacked up.
1. The Microwave Method (The Convenient Failure)
When time is short, turning to the microwave is tempting. This approach involves layering raw strips between sheets of paper towels and zapping them on high for a few minutes.
While it wins maximum points for sheer speed, the final product is highly disappointing. The bacon emerges tough, leathery, and unevenly cooked, completely lacking the rich, deep browning and satisfying sizzle that comes from traditional fat rendering. This method is best reserved for making emergency salad toppings, not for a sit-down meal.

2. The Sous Vide Method (Too Much Wait for Little Reward)
On the opposite end of the speed spectrum sits the sous vide technique. This modern culinary approach requires vacuum-sealing the bacon and immersing it in a precision-controlled water bath at 145°F for a staggering 12 hours.
While the theory suggests it should yield incredibly tender meat, the reality fails to impress. The long-awaited texture is ultimately pleasant but altogether underwhelming. Spending half a day waiting for mediocre bacon makes this high-effort experiment easy to skip for everyday cooking.
3. The Hot Skillet vs. Cold Skillet Approaches (The Stovetop Battle)
The stovetop testing divided traditional frying into two distinct strategies: dropping meat into a preheated pan versus starting it in a completely cold skillet.

[ Preheated Skillet ] ──> Strips Seize & Curl Immediately ──> Uneven Browning & Raw Pockets
[ Cold Skillet ] ─────> Fat Renders Gradually ───────────> Flatter, Uniformly Crispy Strips
When thrown into a screaming hot pan, the protein fibers seize up instantly, causing the strips to curl, shrivel, and warp. This leads to frustrated cooking, where the edges burn while the curled pockets remain rubbery and undercooked.
Conversely, the cold-start skillet method yields significantly better results. Allowing the pan and the pork to heat up together gives the fat ample time to liquefy and render gradually. This results in much flatter strips and a far more uniform crunch, making it an excellent option if you are only frying two or three breakfast portions.
4. The Ridge-Heavy Grill Pan (Inconsistent Heat)
Utilizing a ridged grill pan yielded results highly comparable to the hot-skillet trial. While the heavy cast-iron ridges imparted attractive, charred grill marks across the meat, the physical elevation prevented the strips from frying evenly in their own rendered fat. Consequently, certain sections turned brittle while neighboring pockets stayed unpleasantly chewy.
5. The Trendy Air Fryer (Great Crisp, Low Volume)
The air fryer initially showed immense promise for balancing modern convenience with an ultra-crispy texture. Circulating intense heat at 350°F cooks the meat beautifully and coaxes out a wonderful crunch.
However, this appliance suffers from a major design flaw: capacity. Most standard air fryer baskets can only hold roughly four strips at a time without overlapping. Forcing multiple batches leads to highly inconsistent results, making it impractical for feeding a family.
The Undisputed Winner: The 400°F Oven Method
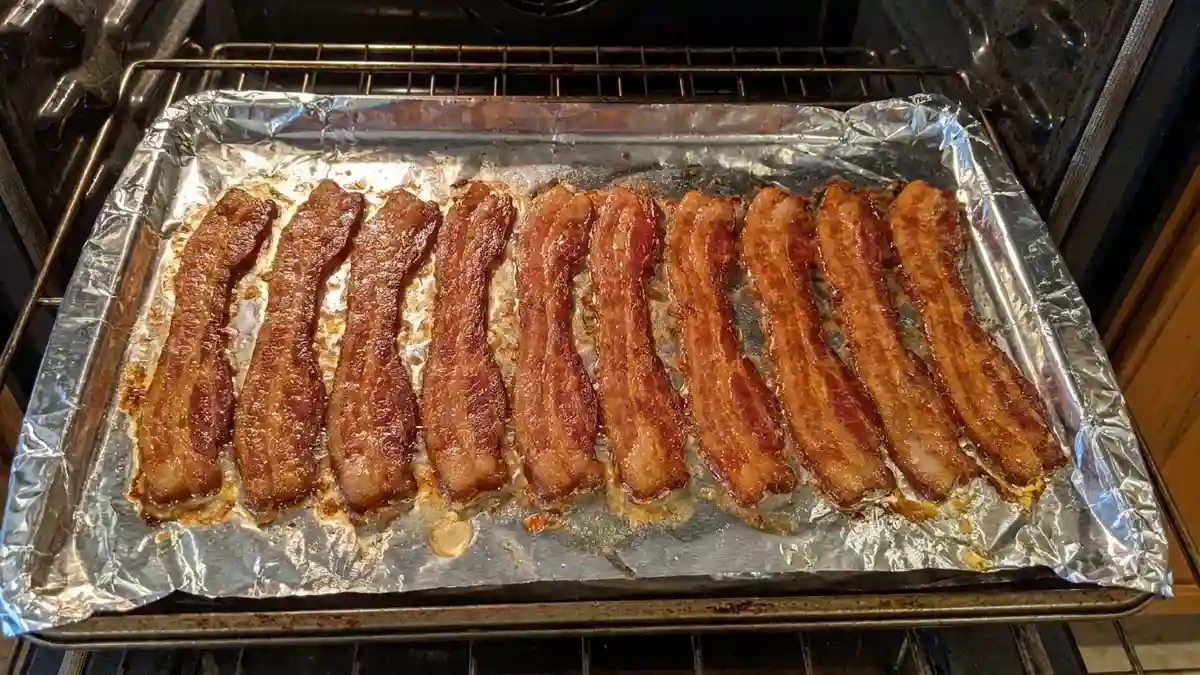
[ Sheet Pan Lined with Foil ] ──> [ Arrange 10 Slices Flat ] ──> [ Bake at 400°F for 22 Mins ] ──> Perfect Uniform Crisp
After reviewing all the data, baking bacon in a conventional oven stood out as the runaway favorite. This incredibly straightforward technique checks every single box for quality, volume, and stress-free cleanup.
Why the Oven Wins
Arranging your strips on a sturdy, rimmed baking sheet lined with aluminum foil and sliding it into an oven preheated to 400°F for roughly 22 minutes yields spectacular results. The ambient heat cooks the meat perfectly from all sides simultaneously, preventing shrinking, warping, or curling. The strips remain beautifully flat, browning uniformly from end to end with an immaculate, mouthwatering crunch.
Maximum Output with Minimal Mess
Beyond superior texture, the oven method completely eliminates the structural limitations of pan frying. A single standard baking sheet easily accommodates up to ten full slices of bacon at once.
Best of all, it puts a definitive end to the painful grease splatters on your stovetop and countertops. Once cooking is complete, you simply transfer the crispy strips to a plate and let the grease cool on the foil before folding it up and tossing it away.
Pro Tips for Flawless Oven-Baked Results
To maximize your success with the winning method, incorporate these expert kitchen tips into your morning routine:
Customize Your Timing: Oven temperatures vary slightly. If you prefer a bit of bend and chew in the center of your breakfast meat, check the progress a few minutes early. For maximum, shatterproof crispiness, let it ride the full 22 minutes or slightly longer.
Rotate the Pan: For the most reliable heat distribution, spin your baking sheet 180 degrees halfway through the cooking time to account for any hidden oven hot spots.
Choose the Right Cut: Opt for standard, regular-cut bacon rather than extra-thick varieties. Thicker slices require a significantly longer rendering time, which often compromises that delicate, sought-after balance between a crispy exterior and a tender center.
Frequently Asked Questions
Should I bake bacon on a wire cooling rack inside the sheet pan?
While utilizing a wire rack allows grease to drip away from the meat, it is generally unnecessary. Baking the strips directly on the foil allows them to shallow-fry in their own rendered fat, which actually enhances flavor and promotes a more uniform, golden crispiness. Plus, skipping the rack saves you from a tedious scrubbing chore.
Can I save the leftover bacon grease from the foil?
Absolutely. Leftover rendered bacon fat is an incredible culinary asset. Simply pour the warm, liquid fat through a fine-mesh strainer into a clean glass jar and store it in the refrigerator. Use it in place of butter or vegetable oil to fry eggs, sauté green beans, or roast potatoes.
Do I need to flip the bacon halfway through baking in the oven?
No flipping is required. Because an oven cooks via ambient, circulating heat, the top and bottom of the strips will brown and crisp up at the exact same rate. Simply rotate the pan itself halfway through to manage internal oven hot spots.
Can I use parchment paper instead of aluminum foil?
Yes, parchment paper works exceptionally well for preventing sticking and absorbing a bit of the excess grease. However, aluminum foil remains the superior choice for effortless cleanup, as it can be easily molded to trap the liquid fat, preventing it from leaking onto your baking sheet.
How do I store and reheat leftover oven-baked bacon?
Store any uneaten cooked strips in an airtight container or a zip-top bag in the refrigerator for up to four days. To reheat and restore that signature crunch, avoid the microwave; instead, pop the strips back into a 350°F oven or a toaster oven for 3 to 5 minutes until they sizzle.