Table of Contents
- 1. The Perfect Match: Why Hostas Thrive in Glass Containers
- 1.1. Shaded Environments and High Moisture Tolerance
- 1.2. Adaptable and Compact Root Structures
- 1.3. Incredible Genetic Resilience
- 2. The Sustainable Appeal of Upcycling Glass Jars
- 3. Step-by-Step Guide to Propagating Hostas in Water
- 3.1. 1. Source and Divide Your Hosta
- 3.2. 2. Prepare the Roots
- 3.3. 3. Set Up the Water Vessel
- 3.4. 4. Optimize Light and Location
- 3.5. 5. Establish a Maintenance Routine
- 4. How to Establish Hostas in Soil-Filled Jars
- 4.1. Creating a False Drainage Layer
- 4.2. Choosing the Right Soil Blend
- 4.3. Planting the Division
- 4.4. Master the Art of Careful Watering
- 5. Pro-Tips for Keeping Jar-Grown Hostas Healthy
- 6. Creative Ways to Style and Display Your Greenery
- 6.1. Curated Windowsill Vignettes
- 6.2. Rustic and Coastal Accents
- 6.3. Vertical Macramé Gardens
- 7. Final Thoughts
- 8. Frequently Asked Questions
- 8.1. Can hostas live permanently in water?
- 8.2. How do I prevent algae from growing inside clear glass jars?
- 8.3. What varieties of hostas work best for indoor jar growing?
- 8.4. How do I know if my soil-grown jar hosta is getting too much water?
- 8.5. Can I transplant my jar-grown hosta back into the outdoor garden?
Why Home Gardeners Are Planting Hostas in Glass Jars This Year
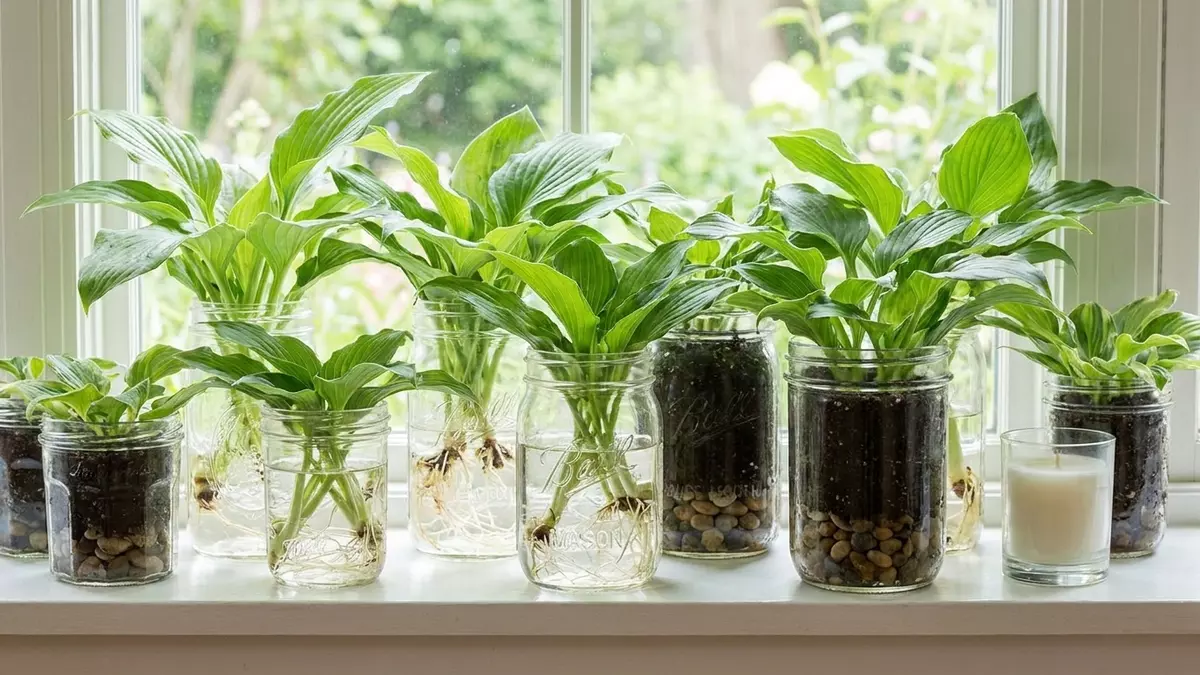
Hostas are the undisputed royalty of the shade garden. Celebrated for their sprawling, texturized foliage and remarkably resilient nature, these perennials have anchored outdoor landscapes for generations. However, a brilliant new indoor gardening trend is taking over windowsills across the country. Gardeners are increasingly ditching traditional plastic nursery pots and shifting toward a more sustainable, visually captivating alternative: upcycled glass jars.
By repurposing everyday glass containers—like old mason jars, empty jam pots, and spent candle vessels—plant enthusiasts have discovered an ingenious way to propagate and display these foliage favorites. This eco-friendly method breathes new life into household waste while offering a front-row seat to the fascinating world of root development. Whether you are a seasoned horticulturist looking to expand your collection or a beginner seeking a low-maintenance indoor project, growing hostas in glass containers is a rewarding DIY endeavor.

Why Home Gardeners Are Planting Hostas in Glass Jars This Year
The Perfect Match: Why Hostas Thrive in Glass Containers
It might seem unusual to place a traditional landscape perennial into a confined glass vessel, but hostas are uniquely biologically equipped for this exact environment. Understanding their natural growth habits explains why they transition so seamlessly to indoor jar cultivation.
Shaded Environments and High Moisture Tolerance
In their native habitats, hostas flourish on forested floors beneath dense tree canopies. This means they are evolutionary adapted to low-light conditions and consistently damp, moisture-rich soils. Because glass jars trap and retain moisture much longer than porous terracotta or breathable plastic, they replicate the damp, humid conditions that hosta root systems crave.
Adaptable and Compact Root Structures
Unlike plants with deep, aggressive taproots, hostas grow in dense, fibrous clumps. Their root systems are incredibly flexible and highly adaptable. When placed in the restricted parameters of a glass jar, the roots neatly coil and conform to the shape of the vessel without sacrificing the plant’s overall health. This unique root architecture allows them to thrive in relatively small spaces for extended periods.
Incredible Genetic Resilience
Hostas are famously difficult to kill. They handle root disturbance, division, and environment changes better than almost any other popular houseplant. If a hosta experiences a brief period of shock during its transition to a jar, its natural hardiness allows it to bounce back rapidly, making it incredibly forgiving for novice gardeners.
The Sustainable Appeal of Upcycling Glass Jars
Embracing the jar-growing method is as beneficial for the planet as it is beautiful for your home. In an era where reducing single-use plastics is more critical than ever, upcycling household glass provides a tangible, stylish solution.
| Jar Type | Best Used For | Aesthetic Vibe |
| Mason Jars | Water Propagation & Long-term Soil Growth | Classic, rustic, and farmhouse-chic |
| Jam & Jelly Jars | Small divisions and early root starting | Charming, compact, and eclectic |
| Cleaned Candle Vessels | Soil-filled tabletop displays | Modern, sleek, and minimalist |
Beyond the obvious ecological and financial advantages of avoiding expensive plastic pottery, glass offers a distinct functional benefit: complete transparency. In standard opaque pots, root health is an invisible guessing game. With clear glass, you can effortlessly monitor root development, check soil moisture levels at a glance, and spot early signs of root rot or pests before they jeopardize the plant.
Step-by-Step Guide to Propagating Hostas in Water
Water propagation is arguably the simplest way to multiply your hosta collection. It is a clean, mess-free process that transforms a simple plant cutting into a living, changing piece of art.

[Select Healthy Hosta] ➔ [Wash Roots Clean] ➔ [Place in Fresh Water] ➔ [Provide Indirect Light]
1. Source and Divide Your Hosta
Begin during the spring or summer when the plant is actively growing. Select a robust, healthy hosta from your garden or a friend’s yard. Gently dig around the base of the plant and lift a small clump away from the main crown. Ensure your division contains at least one healthy leaf stem (an “eye”) and a viable portion of the root system attached to the base.
2. Prepare the Roots
Before introducing the cutting to its new water home, thoroughly rinse away all residual outdoor soil and debris under room-temperature running water. Cleaning the root system is a crucial step; any organic soil left behind will introduce bacteria to the water, which rapidly leads to stagnant odors and root decay.
3. Set Up the Water Vessel
Fill your chosen upcycled jar with clean, room-temperature water. Gently lower the hosta division into the container. It is vital to position the plant so that only the root system is submerged. The crown—the point where the leaves meet the roots—should rest safely above the water line. If the leaf stems sit under water, they will quickly rot.
4. Optimize Light and Location
Place your propagation jar in a location that receives bright, indirect sunlight. A north-facing windowsill or a spot a few feet away from a sunny window is ideal. Avoid harsh, direct sunlight at all costs. Direct rays will rapidly heat the water in the glass jar, essentially cooking the delicate roots and encouraging rapid, unwanted algae growth.
5. Establish a Maintenance Routine
To keep the environment oxygenated and clean, replace the water every 4 to 5 days. Within roughly 7 to 10 days, you will notice fine, white subterranean roots beginning to sprout from the main root mass. Once these new roots reach a length of two to three inches, you can choose to transplant the division into soil or keep it growing in water long-term.
How to Establish Hostas in Soil-Filled Jars
If your goal is to keep your hostas growing indoors for months or even years, moving them into a soil medium provides the essential nutrients they need to sustain larger foliage growth.
Creating a False Drainage Layer
Because upcycled household jars lack traditional bottom drainage holes, you must create a built-in drainage system to protect the plant from overwatering. Begin by pouring 1 to 2 inches of small river pebbles, gravel, or horticultural charcoal directly into the bottom of the clean jar. This creates an open reservoir where excess water can safely settle away from the delicate roots.
Choosing the Right Soil Blend
Never use heavy outdoor garden soil, which packs down tightly and suffocates roots in closed containers. Instead, opt for a premium, lightweight potting mix designed for indoor plants. For maximum success, blend the potting soil with a handful of perlite or coconut coir. This composition ensures the medium stays airy, loose, and well-oxygenated.
Planting the Division
Add a layer of your specialized soil blend over the drainage pebbles. Place your hosta division gently into the jar, spreading its roots outward rather than cramming them downward. Fill in the remaining space with soil, tapping the jar gently to settle the earth. Ensure the crown of the hosta sits just barely above the soil surface to prevent moisture damage to the stems.
Master the Art of Careful Watering
Watering a container without drainage holes requires a light, intentional touch. Moisten the soil lightly immediately after planting. Going forward, only water when the top inch of soil feels completely dry to the touch. Look through the clear glass: if you can see moisture droplets or standing water in the bottom pebble layer, hold off on watering.
Pro-Tips for Keeping Jar-Grown Hostas Healthy
Prioritize Wide-Mouth Vessels: Always select jars with wide openings. This allows for excellent air circulation across the surface of the soil or water, and makes it significantly easier to remove the plant later if it outgrows its home.
Rotate for Balanced Growth: Indoor plants naturally lean toward their light source. Give your jars a quarter-turn every few days to ensure your hosta grows upright, symmetrical, and beautifully balanced.
Provide Minimal Nutrition: If you choose to keep your hosta growing strictly in water for more than a month, it will require supplemental nutrients. Add a few drops of a highly diluted, water-soluble liquid fertilizer to the water once a month during the active growing season.
Practice Pruning Hygiene: As older, outer leaves mature, they may yellow or fade. Use a pair of clean, sharp shears to snip these leaves off near the base. This keeps the display looking pristine and redirects the plant’s energy into producing fresh, vibrant new foliage.
Creative Ways to Style and Display Your Greenery
The true joy of growing hostas in upcycled jars lies in the endless styling possibilities. The striking contrast of vibrant green leaves sitting atop architectural glass elements introduces an instant organic warmth to any interior design style.
Curated Windowsill Vignettes
Gather a small collection of upcycled jars in varying heights and shapes. Plant a different miniature or small-stature hosta variety in each, and arrange them along a kitchen windowsill or a dining room sideboard. The staggered heights create an eye-catching, layered botanical display.
Rustic and Coastal Accents
Give your jars a personalized, handmade touch by wrapping the necks with natural jute twine, rustic raffia, or elegant satin ribbons. You can attach small, handwritten brown paper tags detailing the hosta variety or the date it was propagated—a charming detail if you plan on gifting your creation.
Vertical Macramé Gardens
Maximize your indoor growing area by slipping your soil or water jars into hand-woven macramé plant hangers. Suspend them from ceiling hooks in front of a shaded window to create a cascading, living green wall that frees up valuable counter and tabletop space.
Final Thoughts
Cultivating and multiplying hostas in upcycled glass jars is far more than a passing internet gardening trend; it is a thoughtful fusion of sustainable living, budget-friendly home decor, and accessible horticulture. By giving a second life to everyday glass jars, you can easily expand your plant family while adding refreshing, low-maintenance greenery to your home. Grab an empty jar, take a small division from the garden, and start your own indoor hosta oasis today.
Frequently Asked Questions
Can hostas live permanently in water?
Yes, hostas can survive and grow in water for long periods, provided they receive proper maintenance. However, because water lacks natural nutrients, hostas grown this way will develop at a slower rate and remain smaller than their soil-grown counterparts. Monthly applications of a highly diluted liquid fertilizer are essential to sustain long-term water growth.
How do I prevent algae from growing inside clear glass jars?
Algae thrives on a combination of water, light, and nutrients. To keep your clear jars pristine, keep them out of direct sunlight and change the propagation water every few days. If algae begins to form on the interior glass, temporarily remove the plant, scrub the jar thoroughly with warm soapy water, rinse well, and return the plant to fresh water.
What varieties of hostas work best for indoor jar growing?
While all hostas can be propagated in jars, miniature and small-stature hosta varieties are best suited for long-term indoor jar life. Varieties like ‘Mouse Ears’, ‘Pandora’s Box’, or ‘Baby Bunting’ naturally stay compact and will not outgrow their glass containers as quickly as giant varieties.
How do I know if my soil-grown jar hosta is getting too much water?
Because upcycled jars lack drainage holes, overwatering is the most common issue. Signs of excess moisture include yellowing lower leaves, a mushy or softened base, and a sour, stagnant odor emanating from the soil. Visually check the bottom of the jar through the glass; if you spot pooled, standing water in the pebble layer, cease watering immediately and let the jar dry out in a well-ventilated area.
Can I transplant my jar-grown hosta back into the outdoor garden?
Absolutely. Hostas are incredibly adaptable. If your jar-grown hosta outgrows its container or you simply want to move it outdoors, you can easily plant it in a shady garden spot. If transitioning a water-propagated hosta to outdoor soil, keep the garden earth consistently moist for the first two weeks to help the water-adapted roots adjust to the density of outdoor soil.