Table of Contents
- 1. What Is Mass Germination?
- 2. Step-by-Step: The Mass Sowing Process
- 2.1. 1. Preparation
- 2.2. 2. Sowing the Seeds
- 2.3. 3. Creating a Microclimate
- 3. Transplanting: The Move to Individual Pots
- 4. Why Mass Germination Wins
- 5. Essential Tips for Success
- 6. Frequently Asked Questions (FAQ)
- 6.1. Can I use this method for large seeds like pumpkins?
- 6.2. Why do my seedlings look “floppy”?
- 6.3. When is the absolute best time to transplant?
- 6.4. What should I do if I see mold on the soil surface?
- 6.5. Is it necessary to use a specialized seed-starting mix?
Master Mass Germination: The Efficient Way to Start Your Garden
Starting seeds for the upcoming season is a rite of passage for every gardener. However, if you have ever spent hours filling dozens of tiny plastic cells with soil, only to find that half of them never sprouted, you understand the tedious nature of traditional seed starting. It is time-consuming, wasteful, and often results in unnecessary clutter.
Enter the “mass germination” technique—a time-honored method used by professional growers and seasoned homesteaders to streamline the spring rush. Instead of treating each seed as a separate project, you treat them as a community, maximizing your space and increasing your success rate.

Master Mass Germination The Efficient Way to Start Your Garden
What Is Mass Germination?
The concept is elegantly simple: rather than sowing one or two seeds per individual cell, you scatter a multitude of seeds into a single shared tray. This shared environment allows you to focus your attention on one container, keeping the soil moisture consistent and the germination conditions stable. Once the seedlings reach a sturdy size—typically when they develop a few sets of true leaves—you simply lift them out and transplant them into their final destination or individual starter pots.

This method is exceptionally well-suited for popular garden staples like zinnias, marigolds, basil, lettuce, and calendula. These plants are resilient enough to handle a move and benefit from the uniform care provided in a mass-sown tray.
Step-by-Step: The Mass Sowing Process
1. Preparation
Start with a clean, shallow container that allows for drainage. Fill it with a high-quality, lightweight seed-starting mix. Avoid heavy garden soil, which can compact and suffocate tender roots. A mixture containing peat moss, perlite, and vermiculite is ideal, as it stays fluffy, retains moisture, and provides excellent aeration.
2. Sowing the Seeds
Scatter your seeds evenly across the surface of the moist mix.
Spacing: While you are grouping them together, avoid overcrowding. Aim for about a half-inch of space between larger seeds like marigolds to prevent them from competing for resources immediately.
Covering: Lightly press the seeds into the mix or cover them with a very fine dusting of the medium. Note that some varieties, such as lettuce, require light to germinate and should be left uncovered on the surface.
3. Creating a Microclimate
Mist the surface gently with a spray bottle to settle the seeds without displacing them. Alternatively, you can set the tray in a shallow pan of water to allow the soil to wick moisture from the bottom up. Once watered, cover the tray with a humidity dome or clear plastic wrap to trap heat and moisture. Place the tray in a warm spot (ideally 70–75°F) and watch for green life to emerge.
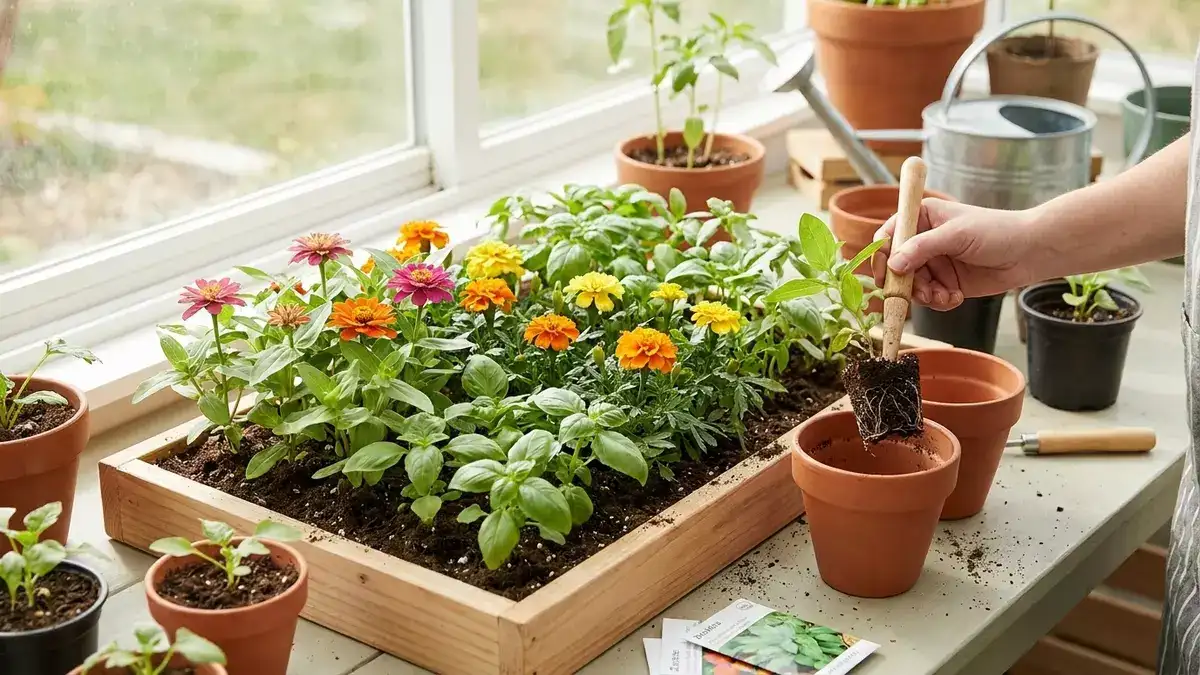
Transplanting: The Move to Individual Pots
When your seedlings showcase two or three sets of leaves, they are ready for their own space. Use a pencil, small stick, or chopstick to carefully loosen the soil underneath the seedling.
Pro Tip: Always handle your seedlings by their leaves. The stem is the plant’s delicate “lifeline,” and even a slight pinch can cause permanent damage. Hold a leaf, gently lift the root mass, and tuck the seedling into its new pot filled with damp, nutrient-rich soil.
Why Mass Germination Wins
Efficiency: You no longer need to manage 50 individual pots, each with its own drying rate. One tray means one focal point for maintenance.
Selection: This method acts as a natural quality control system. You can easily identify and “prick out” only the strongest, healthiest seedlings, ensuring your garden is populated by the most vigorous plants.
Material Savings: You aren’t wasting potting mix and space on empty cells where seeds failed to sprout.
Better Growth: The mass-sowing environment allows the soil to hold moisture more effectively, reducing the likelihood of your seedlings drying out during the day.
Essential Tips for Success
Even with a streamlined method, attention to detail remains key:
Avoid Overcrowding: A standard nursery tray can comfortably house 30 to 50 seeds. Pushing the limit leads to tangled root systems, making transplanting difficult and stressful for the plants.
Master the Moisture: Aim for the consistency of a well-wrung-out sponge. Soggy soil is the enemy—it cuts off oxygen to the roots and invites mold. If the surface looks dry, use a gentle mist.
Prioritize Light: Seedlings require 12 to 14 hours of light daily to prevent them from becoming “leggy” or thin. If you don’t have a sunny south-facing window, use dedicated grow lights positioned just a few inches above the plants.
Frequently Asked Questions (FAQ)
Can I use this method for large seeds like pumpkins?
While it is possible, larger seeds prefer to be sown individually because they grow very rapidly and their roots can become tangled almost overnight. Mass germination is best reserved for smaller seeds.
Why do my seedlings look “floppy”?
This is usually a sign of insufficient light. When seedlings don’t have enough sun, they stretch quickly in a desperate search for energy. Increase your light duration and intensity immediately to encourage compact, sturdy growth.
When is the absolute best time to transplant?
Don’t wait until the seedlings are bumping into each other. Transplanting is safest when the plants are still small and manageable, before their root systems have become a single, inseparable mat.
What should I do if I see mold on the soil surface?
Mold often indicates too much humidity and a lack of air circulation. Remove the humidity dome or plastic cover, increase ventilation, and ensure you aren’t overwatering. A small fan set to a low setting near the trays can also help.
Is it necessary to use a specialized seed-starting mix?
Yes, it is highly recommended. Standard garden soil or heavy potting soil often contains pathogens that can cause “damping off”—a disease that kills young seedlings. A sterile, light seed-starting mix provides the cleanest environment for your “green community” to flourish.