Table of Contents
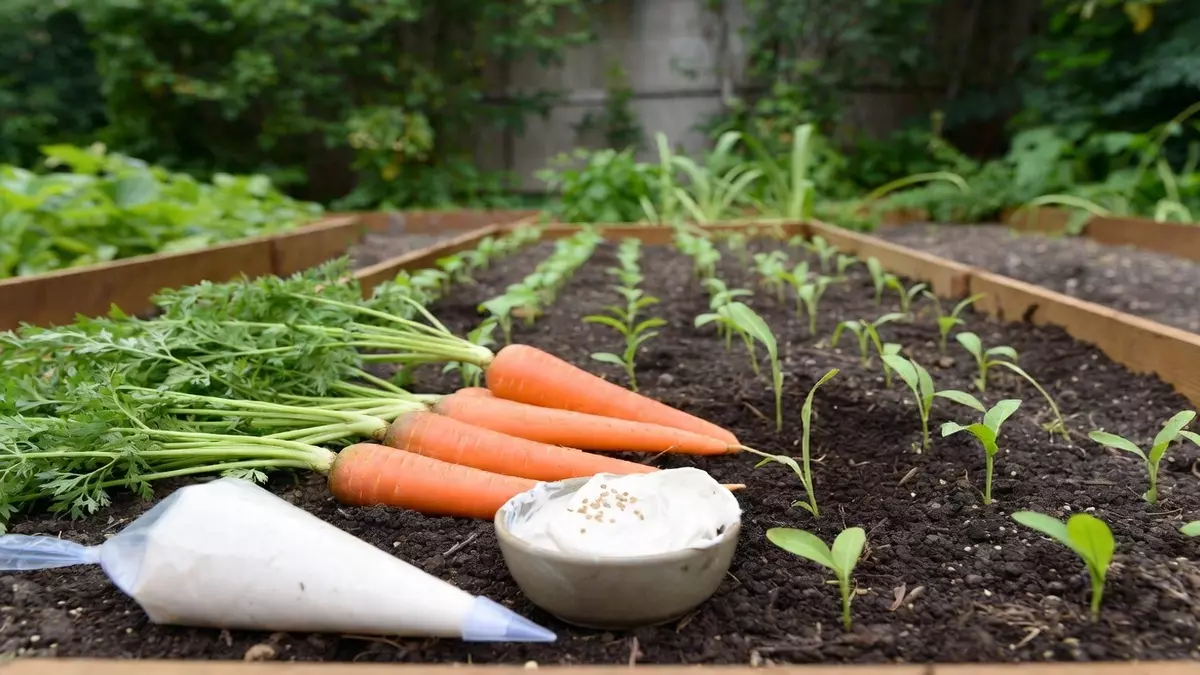
**Carrot Seeds Made Easy: The Cornstarch Slurry Trick**
Carrot seeds are notoriously tricky to plant. Tiny, lightweight, and prone to clumping, they often stick to your fingers, blow away in a breeze, or land in uneven piles. This leads to overcrowded seedlings that require tedious thinning later — wasting time and seeds.
Fortunately, a simple kitchen trick using cornstarch can transform the entire process. By creating a smooth slurry, you can pipe carrot seeds directly into neat, evenly spaced rows with minimal effort. This method delivers better germination, reduces waste, and results in healthier, more uniform carrots.
Whether you’re a beginner gardener or a seasoned pro tired of messy sowing, this cornstarch technique offers a practical, low-cost solution that delivers consistent results.


Carrot Seeds Made Easy The Cornstarch Slurry Trick
### Why the Cornstarch Slurry Method Works So Well
Cornstarch mixed with water forms a gentle, clear gel that suspends seeds evenly. This prevents clumping while allowing precise placement in garden rows or raised beds. The gel also retains moisture around each seed, creating ideal conditions for germination during those critical first days when soil can dry out quickly.
Unlike traditional broadcasting or hand-sowing, this approach mimics professional seed tape but costs almost nothing. It works especially well for small-seeded crops like carrots, lettuce, and parsnips. Gardeners report up to 50% less thinning time and more uniform root development because plants aren’t competing for space from the start.
The science is straightforward: cornstarch is a natural thickener that holds moisture without harming seeds. When cooled properly, it creates the perfect consistency for controlled application — giving every seed its best chance at strong, straight growth.
### Benefits of Using Cornstarch for Planting Carrot Seeds
 Baking Soda Overuse Damages Houseplants
**Even Spacing and Less Thinning**
Precise rows mean seedlings emerge with proper spacing, reducing the need for hours of hand-thinning. This saves time and prevents root disturbance that can stunt growth.
**Better Moisture Retention**
The gel holds water near each seed, promoting faster and more reliable germination — especially helpful in dry or windy conditions.
**Seed Efficiency**
You use exactly the number of seeds needed instead of oversowing to compensate for poor distribution. This stretches expensive or heirloom seed packets further.
**Improved Soil Contact**
The slurry ensures good seed-to-soil contact, which is essential for tiny carrot seeds that need consistent moisture to sprout.
**Eco-Friendly and Inexpensive**
Made from pantry staples, this method avoids plastic seed tapes or commercial gels while reducing seed waste.
### What You’ll Need for the Cornstarch Carrot Planting Method
– 2 tablespoons cornstarch
– 1 cup cold water
– Small saucepan
– Wooden spoon or whisk
– Carrot seeds (any variety)
– Zip-top plastic bag or small squeeze bottle
– Prepared garden bed or container with loose, well-draining soil
– Optional: compost or fine vermiculite for light covering
### Simplified Step-by-Step Instructions
**Step 1: Make the Cornstarch Slurry**
Combine 2 tablespoons of cornstarch with 1 cup of cold water in a saucepan. Stir well to dissolve any lumps. Heat over medium heat, stirring constantly, until the mixture thickens into a smooth, glossy gel (about 3–5 minutes). Remove from heat and let it cool completely to room temperature. Never add seeds to hot gel.
**Step 2: Add the Seeds**
Once cooled, gently stir your carrot seeds into the gel. Use about 1–2 teaspoons of seeds per batch, depending on how many rows you’re planting. Mix until seeds are evenly distributed.
**Step 3: Load and Pipe the Rows**
Spoon the seed gel into a zip-top bag. Snip a small corner (about 1/8 inch) to create a piping tip. Or use a clean squeeze bottle. Squeeze gently to pipe thin, even lines of gel directly onto prepared soil where you want your carrots to grow. Space rows 12–18 inches apart.
**Step 4: Cover and Water Gently**
Sprinkle a very light layer (1/4 inch or less) of fine soil or compost over the gel lines. Water the bed softly with a mist setting or watering can to settle everything without washing away the slurry. Keep the soil consistently moist until seedlings emerge (usually 10–21 days).
### Preparing Your Garden Bed for Success
Before piping, ensure your soil is loose and rock-free — carrots need deep, friable soil for straight roots. Work in compost or aged manure for nutrients, aiming for a slightly acidic pH (6.0–6.8). Raised beds or deep containers work wonderfully with this method.
For heavy clay soils, mix in sand or perlite to improve drainage. Avoid fresh manure, which can cause forking in carrot roots.
### Tips for Best Results with the Cornstarch Trick
– **Consistency Check**: The gel should flow smoothly but not be watery. If too thick, add a splash of water. If too thin, return to low heat briefly.
– **Seed Distribution**: Stir the mixture occasionally while piping to prevent seeds from settling.
– **Timing**: Plant when soil temperatures reach 50–85°F (10–29°C) for optimal germination.
– **Variety Selection**: This method works with all carrot types — try Nantes for shorter beds or Imperator for deeper soil.
– **Succession Planting**: Make multiple batches every 2–3 weeks for continuous harvests throughout the season.
– **Storage**: Use the slurry immediately for best results. Leftover gel can be refrigerated for 1–2 days.
### Troubleshooting Common Issues
**Gel Too Runny or Too Thick**
Adjust water or cooking time slightly. Practice with a small test batch first.
**Poor Germination**
Ensure consistent moisture and avoid burying seeds deeper than 1/4 inch. Protect young seedlings from birds or pests with row cover.
**Clumping Despite Slurry**
Make sure the gel cools fully and stir well before piping. Use fresher seeds for higher viability.
**Crooked or Forked Roots**
This usually results from compacted soil or rocks. Prepare beds deeply and avoid disturbing roots after sprouting.
### Advanced Variations and Creative Uses
Once comfortable with carrots, try this technique with other small seeds like celery, radish, or herbs. Some gardeners add a diluted liquid kelp or compost tea to the slurry for extra nutrients.
For container gardening, the method shines in window boxes or patio pots. You can also create custom seed tapes by piping lines onto strips of paper towel, drying them, and rolling for storage.
### Long-Term Rewards of Better Carrot Planting
Using the cornstarch slurry leads to stronger plants with better root development. Uniform spacing allows each carrot enough room, sunlight, and nutrients, resulting in larger, sweeter harvests. Many gardeners report higher overall yields and fewer misshapen roots.
This technique also makes gardening more enjoyable by removing the frustration from seed sowing. It encourages more frequent planting and experimentation with different carrot varieties — from colorful rainbow mixes to classic orange types.
### Conclusion
The cornstarch slurry trick turns one of gardening’s most frustrating tasks into something simple, controlled, and even satisfying. With just cornstarch, water, and a few minutes of prep, you can achieve neat rows of carrot seedlings that require minimal thinning and deliver beautiful, straight roots.
This method proves that great gardening doesn’t require fancy tools — sometimes the best solutions come straight from your kitchen pantry. Give it a try in your next planting session and enjoy the satisfaction of perfectly spaced carrot beds that grow into a delicious, homegrown harvest.
Whether you have a large backyard plot or a few raised beds on a balcony, this technique can help you grow better carrots with less stress. Happy planting!
### Frequently Asked Questions
**How deep should I cover the cornstarch slurry?**
Just a very light 1/4 inch or less of soil. Carrot seeds need light to germinate well and don’t like being buried too deeply.
**Can I use this method for other vegetables?**
Yes! It works great with any small seeds like lettuce, beets, spinach, or herbs. Adjust spacing according to each plant’s needs.
**Will the cornstarch harm my soil or plants?**
No. Cornstarch is completely natural and breaks down quickly into harmless sugars. It actually helps retain moisture during germination.
**How long does the slurry last?**
Use it fresh for best results. You can refrigerate leftover gel for 1–2 days, but make a new batch for later plantings.
**What if my gel is too thick to pipe easily?**
Add a small amount of cool water and stir thoroughly. If it’s too runny, gently reheat while stirring until it thickens slightly.
**When is the best time to plant carrots with this method?**
Early spring or late summer for fall crops. Soil should be at least 50°F (10°C) for reliable germination.
**Do I need to thin seedlings when using the slurry?**
Usually much less than traditional sowing. Proper spacing from piping often eliminates the need for heavy thinning.