Table of Contents
How to Build a DIY Root Cellar From an Old Refrigerator
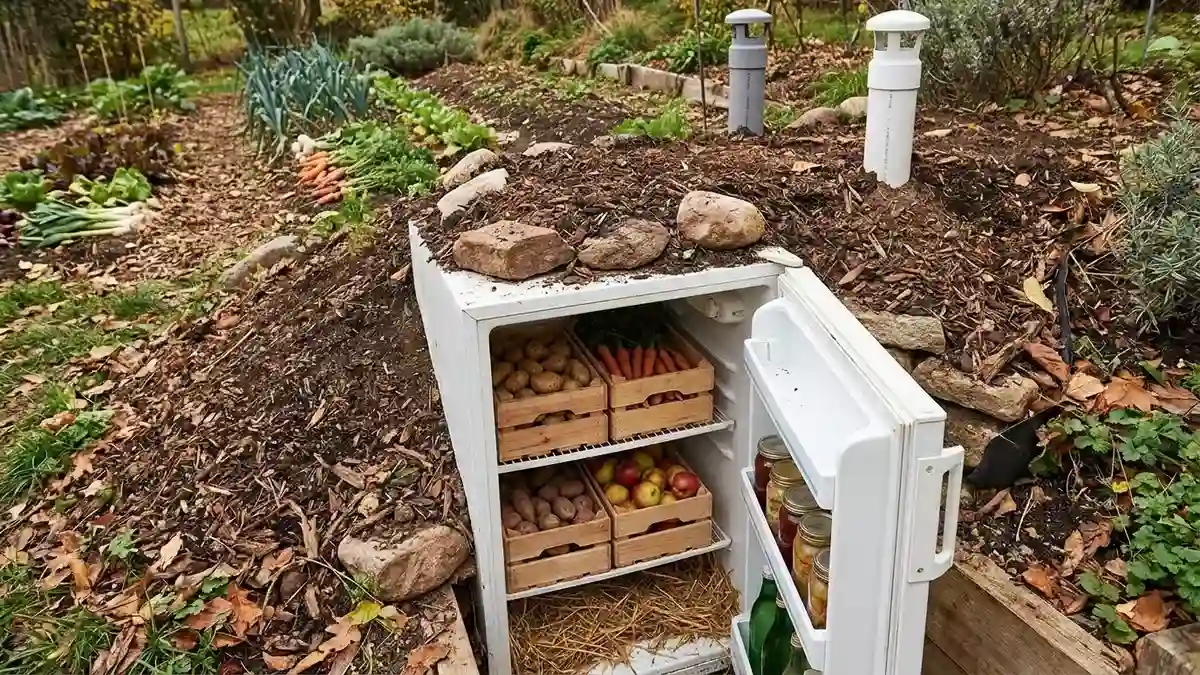
Storing a bumper crop can be a major challenge for the home gardener. When your pantry overflows with potatoes, carrots, and apples, the solution isn’t always to build a costly, time-consuming underground stone cellar. If you have an old refrigerator or chest freezer gathering dust in your garage, you already possess the perfect foundation for a high-performance mini root cellar.
By repurposing these insulated appliances, you can create a temperature-controlled, pest-proof environment that keeps your produce crisp and fresh throughout the winter months. This project is not only an excellent way to practice upcycling but also a practical step toward greater food security and self-sufficiency.

How to Build a DIY Root Cellar From an Old Refrigerator
Why Old Refrigerators Make Excellent Root Cellars
At their core, refrigerators and chest freezers are designed for one purpose: climate control. They are built with thick, robust insulation and airtight seals. When buried in the ground, these features work in tandem with the earth’s natural thermal mass.

The soil acts as an insulator, keeping the interior temperature between $35^{\circ}F$ and $50^{\circ}F$—the “sweet spot” for long-term vegetable storage. Furthermore, the solid walls of the appliance provide a fortress against rodents and insects that would otherwise spoil your hard-earned harvest. Repurposing an old unit is a sustainable way to keep bulky items out of landfills while gaining a valuable piece of garden infrastructure.
Selecting the Ideal Site
Location is everything when it comes to underground storage. Follow these guidelines to ensure your root cellar remains functional year-round:
Drainage is Priority: Avoid areas prone to pooling water. A waterlogged site can lead to flooding and produce rot.
Sun Exposure: Choose a north-facing area or a spot that remains heavily shaded. The less direct sunlight hits the ground above your unit, the more stable the internal temperature will remain.
Accessibility: Choose a site that is close enough to your home to be reachable during winter storms, yet far enough away that the heat from your home’s foundation doesn’t affect the cellar’s temperature.

Preparing Your Unit for Storage
Before installation, you must decommission the appliance to ensure it is safe for food storage and the environment.

Decommissioning: Carefully remove all electrical components, including the compressor, internal wiring, and coolant lines. Note: Ensure any refrigerant is removed by a professional if the unit is still pressurized. You want a clean, hollow, non-toxic shell.
Sanitization: Scrub the interior thoroughly with a mixture of vinegar and water to eliminate lingering odors and bacteria.
Moisture Management: Drill several small holes in the bottom of the unit to allow any accumulated condensation or accidental water seepage to drain into the gravel base.
Ventilation: Proper airflow is essential to prevent mold and the buildup of naturally occurring gases. Install two PVC pipes: one near the bottom for air intake and one near the top for exhaust.
Installing Your Underground Cellar
Once your unit is prepped, it is time to move it into the earth.
The Foundation: Dig your hole, ensuring it is slightly wider than the fridge. Place at least 4–6 inches of gravel at the bottom. This is critical for preventing water from pooling around the base.
Placement: Carefully lower the fridge into the hole. If you are using a chest freezer, ensure the opening is flush with or slightly above the ground level. If using an upright fridge, angle the door slightly downward so that surface water runs off the unit rather than into the seal.
Backfilling: Gradually backfill the area around the sides with soil, packing it down firmly as you go to maximize insulation.
Camouflage: You can disguise the top of your cellar with mulch, native rocks, or decorative garden elements to help it blend seamlessly into the landscape.
Organizing and Maintaining Your Harvest
To maximize your storage life, organization and maintenance are key.
Bedding: Create a base layer of straw or sand inside the unit to help regulate humidity levels.
Separation: Keep root vegetables like beets, potatoes, and carrots together. However, keep apples and other fruits separate. Many fruits release ethylene gas as they ripen, which will cause your vegetables to sprout or spoil prematurely.
Routine Checks: Every few weeks, open the unit for a few minutes to freshen the air. Check your produce for any signs of decay. If the interior feels too damp, a small bucket of charcoal or extra dry straw can act as a natural desiccant to absorb excess moisture.
Essential Safety Reminders
Safety is the most important aspect of this project. Even in a garden setting, you must take precautions:
The Escape Mechanism: If the unit is large enough for a person to climb into, ensure it can be opened from the inside. Never leave a heavy, self-locking door intact without a way to disengage the latch from within.
Child and Pet Safety: If you have small children or curious pets, secure the lid or door with a simple external latch or surround the area with a small fence.
Avoid Airtight Seals: When the unit is not in use, ensure it is kept slightly propped open to prevent stagnant air and potential hazards.
By following these steps, you can transform a discarded appliance into a thriving root cellar, ensuring your garden’s harvest feeds your family long after the frost has settled.