Table of Contents
- 1. What is a Mosquito Bucket of Doom?
- 1.1. How Bti Safely Eliminates Mosquito Larvae
- 2. Why This Larvae Trap Outperforms Traditional Chemical Sprays
- 3. Everything You Need to Build Your DIY Mosquito Trap
- 3.1. Material Checklist
- 4. Step-by-Step Guide to Creating Your Mosquito Bucket of Doom
- 4.1. Step 1: Brew the Fermented “Mosquito Tea”
- 4.2. Step 2: Inoculate the Water with Bti
- 4.3. Step 3: Protect Local Wildlife
- 4.4. Step 4: Position the Bucket Strategically
- 5. Routine Maintenance for Long-Lasting Success
- 5.1. Water Levels and Refreshing the Bait
- 5.2. Reapplying the Bti
- 6. Weighing the Pros and Cons
- 7. Final Thoughts: Reclaim Your Backyard Safely
- 8. Frequently Asked Questions
- 8.1. 1. How long does it take for the bucket to start working?
- 8.2. 2. Will the Mosquito Bucket of Doom attract more mosquitoes to my yard?
- 8.3. 3. Is Bti safe if my dog or cat drinks from the bucket?
- 8.4. 4. How many buckets do I need for a standard backyard?
- 8.5. 5. Can I use this DIY trap during the winter months?
3 Simple Steps to Build a Mosquito Bucket of Doom This Summer
If your plans for a relaxing evening on the patio are constantly ruined by a swarm of buzzing, biting pests, you are not alone. Mosquitoes have a knack for turning any outdoor gathering into a miserable experience. While most people instinctively reach for chemical bug sprays, noisy zappers, or pricey professional treatments, there is a much smarter, budget-friendly, and eco-friendly alternative you can build right at home.
Enter the Mosquito Bucket of Doom.
Despite its ominous-sounding name, this DIY mosquito trap is a safe, highly strategic weapon against backyard pests. Instead of chasing down adult insects, this clever trick targets mosquitoes at their most vulnerable stage: the larval phase. By eliminating the next generation before they ever get the chance to fly or bite, you can drastically reduce the pest population in your yard.


3 Simple Steps to Build a Mosquito Bucket of Doom This Summer
What is a Mosquito Bucket of Doom?
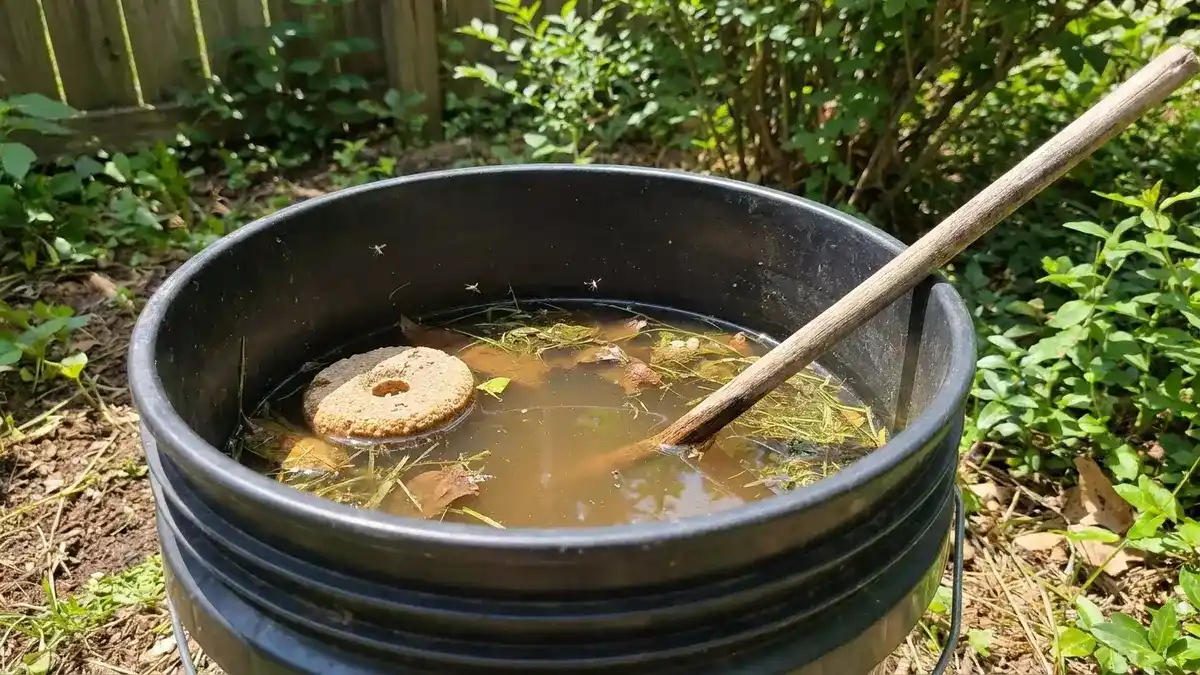
At its core, the Mosquito Bucket of Doom is a biological trap designed to trick female mosquitoes into a fatal mistake. The setup utilizes a standard 5-gallon bucket filled with water and organic matter, such as grass clippings, straw, or leaves. As this mixture sits in the sun, it ferments and creates a stagnant, nutrient-rich “mosquito tea.”
To a female mosquito looking for a place to deposit her eggs, this smelly, stagnant water is an irresistible nursery. However, the secret weapon hidden inside the bucket is Bti (Bacillus thuringiensis israelensis).

How Bti Safely Eliminates Mosquito Larvae
Bti is a naturally occurring soil bacterium that specifically targets the digestive systems of certain insect larvae. When the mosquito eggs hatch inside your bucket, the microscopic larvae immediately begin feeding on the organic nutrients in the water, ingesting the Bti in the process. Within hours, the larvae are eliminated.
The best part? Bti is completely non-toxic to humans, household pets, and horses. It also won’t harm beneficial garden pollinators like honeybees, butterflies, or ladybugs, making it an incredibly environmentally responsible choice for backyard pest control.
Why This Larvae Trap Outperforms Traditional Chemical Sprays
Most conventional mosquito control methods are reactive. Broadcast chemical sprays and foggers only target the adult mosquitoes that are currently flying around your yard. While this might provide temporary relief, it fails to address the root of the problem. Furthermore, heavy chemical sprays can kill beneficial insects, leave behind toxic residues, and wash away with the next rainstorm.

The Mosquito Bucket of Doom takes a proactive approach by exploiting the natural reproductive instincts of the pest.
Targets the Root Cause: A single female mosquito can lay hundreds of eggs at a time. By destroying the larvae, you break the breeding cycle completely.
Continuous Protection: While sprays dissipate in a matter of days, a properly maintained Bti bucket works around the clock for weeks at a time.
Eco-Friendly Dynamics: It pulls mosquitoes away from your living spaces and concentrates them into a controlled environment where they cannot survive.
Everything You Need to Build Your DIY Mosquito Trap
One of the greatest advantages of this project is that you likely already have most of the necessary materials sitting in your garage or backyard.
Material Checklist
A 5-Gallon Bucket: Dark-colored buckets (such as black or dark green) work best because they absorb heat and mimic the dark, shaded pools of water that mosquitoes naturally seek out.
Organic Material: A handful of fresh grass clippings, hay, straw, or dried autumn leaves.
Water: Plain tap water or collected rainwater works perfectly.
Bti Packets: Look for commercial products like “Mosquito Dunks” or “Mosquito Bits” at your local garden center or online hardware store.
A Sturdy Stick: A branch long enough to protrude from the top of the bucket to act as an escape route for small wildlife.
Optional Safety Mesh: A piece of chicken wire, hardware cloth, or wide-mesh netting to cover the top.
Step-by-Step Guide to Creating Your Mosquito Bucket of Doom
Setting up your trap takes less than fifteen minutes. Follow these simple steps to ensure maximum effectiveness.
Step 1: Brew the Fermented “Mosquito Tea”
Fill your 5-gallon bucket roughly half-way to two-thirds full with water. Toss in your handful of grass clippings, hay, or leaves. Place the bucket in a sunny spot for 24 to 48 hours to kickstart the fermentation process. As the organic material breaks down, it will emit an earthy, stagnant odor. While it might smell unpleasant to you, this scent acts as an irresistible homing beacon for pregnant mosquitoes.
Step 2: Inoculate the Water with Bti
Once your water has aged and turned into a dark, funky brew, it is time to add the active ingredient. If you are using solid Mosquito Dunks, break off a quarter to a half of a ring and drop it directly into the water. If you are using loose Mosquito Bits, sprinkle a few teaspoons across the surface. The Bti will gradually dissolve and distribute throughout the water column.
Step 3: Protect Local Wildlife
Insects aren’t the only creatures attracted to standing water. To prevent small yard wildlife—such as frogs, lizards, or field mice—from accidentally drowning, place a long stick diagonally into the bucket. Ensure the top of the stick rests securely against the rim, giving any trapped critter a ramp to climb out safely.
Step 4: Position the Bucket Strategically
Location is everything. Do not place the bucket right next to your patio table or back door, as you do not want to draw mosquitoes toward your family. Instead, place the bucket in a shaded, damp, and sheltered area near the perimeter of your yard, such as under a bush or near a woodpile. This coaxes the pests away from your outdoor living zones.
Routine Maintenance for Long-Lasting Success
While the Mosquito Bucket of Doom is incredibly low-maintenance, it is not a “set-it-and-forget-it” solution. A neglected bucket can eventually lose its Bti potency and turn into an actual breeding ground, so keep these upkeep tips in mind:
Water Levels and Refreshing the Bait
During hot summer weeks, evaporation will cause the water level to drop. Top off the bucket with fresh water whenever it gets low. If the water begins to look clear or loses its earthy aroma, toss in a fresh handful of grass or leaves to keep the fermentation process going.
Reapplying the Bti
A single dose of Bti generally remains active for about 30 days. Mark your calendar to add a fresh quarter-dunk or a sprinkle of bits once a month. Additionally, if your area experiences a severe, torrential rainstorm that overflows the bucket, you should add a fresh dose of Bti immediately to replace what washed away.
Safety Note: If you have curious toddlers or pets, always secure the top of the bucket with a wide mesh cover or chicken wire. This allows mosquitoes to pass through easily while preventing kids or dogs from messing with the water.
Weighing the Pros and Cons
| Advantages | Limitations |
| Highly Cost-Effective: Costs only pennies a month to operate and maintain. | Delayed Results: Does not kill living adult mosquitoes immediately; takes a few weeks to notice a drop in population. |
| Eco-Friendly: Safe for bees, butterflies, pets, birds, and children. | Requires Upkeep: Demands monthly Bti top-offs and occasional water refills. |
| Eliminates the Source: Destroys larvae before they can mature and multiply. | Area Coverage: Large properties may require multiple buckets placed around the perimeter for full coverage. |
Final Thoughts: Reclaim Your Backyard Safely
The Mosquito Bucket of Doom is a premier example of working with nature rather than against it. By understanding the reproductive habits of mosquitoes, you can turn their own biology against them, establishing a chemical-free perimeter that keeps your family safe all season long. Grab an old bucket, some yard clippings, and a pack of Bti dunks this weekend to experience a bite-free summer.
Frequently Asked Questions
1. How long does it take for the bucket to start working?
The fermentation process takes about 2 to 3 days to start attracting mosquitoes. Once eggs are laid and hatched, the Bti kills the larvae within 24 hours. You will generally notice a visible reduction in the overall adult mosquito population within 2 to 3 weeks as the local breeding cycle breaks down.
2. Will the Mosquito Bucket of Doom attract more mosquitoes to my yard?
The trap uses scent to attract mosquitoes that are already in your immediate neighborhood. Because you place the bucket away from your porch or deck, it draws those existing pests away from you and traps their offspring, ultimately lowering the local population.
3. Is Bti safe if my dog or cat drinks from the bucket?
Yes. Bti (Bacillus thuringiensis israelensis) is a highly specific bacterium that only triggers a toxic reaction in the highly alkaline digestive tracts of mosquito larvae, fungus gnats, and blackflies. It is completely harmless to mammals, birds, fish, and amphibians. However, using a mesh cover is still recommended to prevent pets from drinking stagnant, fermented water.
4. How many buckets do I need for a standard backyard?
For an average suburban yard (roughly a quarter-acre), one or two strategically placed buckets on opposite sides of the property are usually sufficient. For larger properties or yards with dense foliage and heavy shade, placing three or four buckets around the perimeter yields the best results.
5. Can I use this DIY trap during the winter months?
Mosquitoes require warm temperatures to remain active and reproduce. In most regions, you only need to run your bucket from early spring through late autumn. Once the first hard frost of winter hits, you can empty the bucket and store it away until the following spring.