Table of Contents
- 1. Understanding Bone Meal: The Underground Anchor for Your Plants
- 1.1. The Science of Soil pH and Phosphorus Availability
- 2. How to Make Bone Meal at Home: A Complete Step-by-Step Guide
- 2.1. Essential Materials and Tools:
- 3. Practical Application: How to Use Bone Meal in the Garden
- 3.1. 1. Direct Application for Bulbs and Transplants
- 3.2. 2. Broad Application for Established Garden Beds
- 3.3. 3. Deep Feeding for Perennials, Trees, and Roses
- 3.4. Golden Timing for Application
- 4. Important Pitfalls and Precautions to Keep in Mind
- 4.1. It Is Not a Complete, All-in-One Fertilizer
- 4.2. The Risk of Phosphorus Overload
- 4.3. Managing Unwanted Wildlife and Pets
- 5. Conclusion: Closing the Sustainability Loop
- 6. Frequently Asked Questions
How to Turn Kitchen Bone Scraps Into Powerful DIY Garden Fertilizer
Every year, tons of food waste end up in landfills, yet some of the most nutrient-dense materials pass right through our kitchens unnoticed. If you have ever stared at a pile of leftover bones after a family dinner and felt guilty throwing them away, there is a better alternative. Instead of tossing them into the trash, you can give those kitchen scraps a second life by converting them into organic bone meal.
Making your own bone meal fertilizer is an excellent way to practice sustainable gardening on a budget. It transforms ordinary kitchen waste into a quiet powerhouse for your soil, helping your plants develop deep, resilient roots and spectacular blooms. For organic gardeners looking to build healthy soil naturally, this homemade amendment is an absolute game-changer. Here is everything you need to know about creating, using, and maximizing the benefits of DIY bone meal in your garden.

How to Turn Kitchen Bone Scraps Into Powerful DIY Garden Fertilizer
Understanding Bone Meal: The Underground Anchor for Your Plants
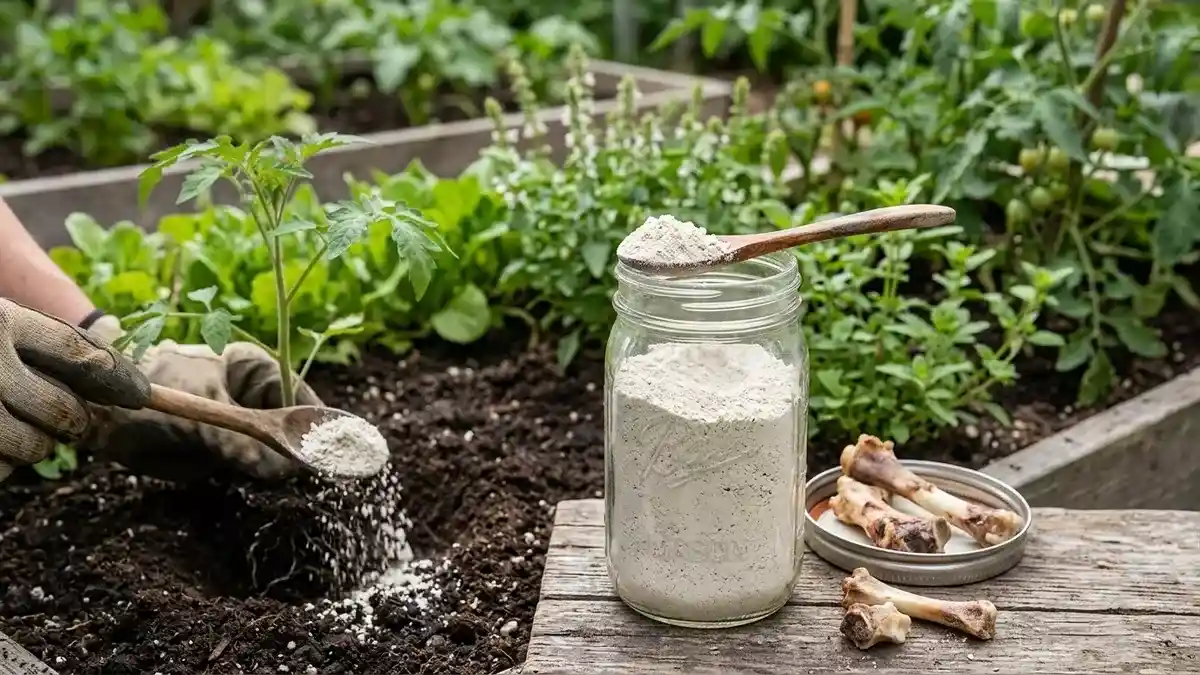
Before diving into the step-by-step process, it helps to understand exactly what bone meal is and why plants love it. Traditionally, commercial bone meal is a finely milled powder derived from animal bones—typically cattle—that have been thoroughly cleaned, steamed, and pulverized. When you make it at home, you achieve the exact same nutrient profile using the scraps from your own meals.
Bone meal is primarily prized for two major elements:
Phosphorus (Typically 12–16%): This vital macronutrient is essential for robust root architecture, heavy flowering, and abundant fruit production. Without adequate phosphorus, plants struggle to establish the structural foundation needed to support top-heavy growth.
Calcium (Typically 20–30%): Calcium acts as a structural building block, strengthening plant cell walls. A healthy supply of calcium prevents common, frustrating physiological disorders like blossom-end rot, which frequently destroys tomatoes, peppers, and eggplants.

The Science of Soil pH and Phosphorus Availability
According to agricultural research, including data from the University of Minnesota Extension, bone meal is not a universal quick-fix. Its effectiveness depends heavily on your soil chemistry. Bone meal releases its nutrients most efficiently in acidic soils with a pH below 7. In alkaline environments, the calcium bonds tightly with the phosphorus, locking it up and making it incredibly difficult for plant roots to absorb.
Because it is a slow-release organic fertilizer, bone meal breaks down gradually over several months through the help of soil microbes and fungi. This makes it a preferred, gentle amendment for bulbs, perennial roses, root vegetables, and heavy-fruiting crops that require sustained, long-term underground support.
How to Make Bone Meal at Home: A Complete Step-by-Step Guide
Creating high-quality fertilizer at home does not require specialized industrial equipment. With a few basic kitchen tools and some patience, you can safely process chicken, beef, or pork bones into a premium soil amendment.
Essential Materials and Tools:
Leftover animal bones (chicken, pork, or beef work best; avoid overly fatty or greasy cuts)
A large stock pot
An oven or a high-capacity food dehydrator
A heavy-duty baking sheet
A hammer, mallet, or a heavy mortar and pestle
A high-powered blender or food processor
A fine-mesh kitchen sifter
An airtight glass jar or storage container
Protective utility gloves
Pro Tip for an Extra Nutrient Boost: You can easily customize your homemade fertilizer by mixing a small amount of clean wood ash (for potassium) or kelp powder (for micronutrients) directly into your stored bone meal. This creates a more balanced, multi-purpose organic amendment.
Practical Application: How to Use Bone Meal in the Garden
Because bone meal breaks down slowly, proper application placement ensures the nutrients dissolve right where the root systems can actually reach them.
1. Direct Application for Bulbs and Transplants
When introducing new seedlings, summer bulbs, or root crops to the garden, apply your bone meal directly to the source. Dig your planting hole and sprinkle roughly one tablespoon of the powder straight into the bottom. Gently scratch the powder into the native soil at the base of the hole so it does not sit in a concentrated clump directly against tender bare roots. Place your plant inside, backfill with soil, and give it a thorough watering to jumpstart the microbial breakdown.
2. Broad Application for Established Garden Beds
If you are prepping an entire raised bed or vegetable plot before spring planting, broadcast the fertilizer evenly across the surface. Aim for a ratio of approximately 10 pounds of bone meal per 100 square feet. Use a garden rake to lightly work the powder into the top two to three inches of topsoil. Watering the entire bed immediately afterward helps settle the powder and prevents it from blowing away in the wind.
3. Deep Feeding for Perennials, Trees, and Roses
For established fruit trees, flowering shrubs, or perennial rose bushes, use a technique called top-dressing. Measure out roughly one cup of bone meal. Instead of dumping it right against the main trunk or stem—which can cause localized irritation—sprinkle it in a wide ring along the plant’s “drip line” (the perimeter where the outermost leaves drip rainwater onto the ground). Lightly scratch it into the mulch or soil surface, then water the area generously to help the phosphorus seep down into the deep root zone.
Golden Timing for Application
To get the most out of this slow-acting fertilizer, timing is everything. The two best windows for application are:
Early Spring: Apply just as perennials and fruit trees wake up from winter dormancy and demand heavy root support for the upcoming season.
Late Fall: Amend your beds in late autumn. This gives the winter rain and soil microbes months to mellow and dissolve the minerals, ensuring the phosphorus is fully bioavailable by the time spring planting arrives.
Important Pitfalls and Precautions to Keep in Mind
While homemade bone meal is an incredibly beneficial organic resource, applying it blindly can lead to a few unintended consequences.
It Is Not a Complete, All-in-One Fertilizer
Bone meal is strictly a targeted supplement. It contains virtually zero nitrogen (which drives lush green leaf growth) and zero potassium (which aids overall plant immunity and water regulation). If you apply only bone meal to leafy greens like spinach, lawns, or fast-growing annual flowers, they will quickly display signs of nutrient deficiencies. Always pair it with compost, aged manure, or a balanced organic fertilizer if your plants require a full N-P-K spectrum.
The Risk of Phosphorus Overload
More is not always better. Before adding large quantities of bone meal to your garden, it is highly recommended to run a basic soil test. If your soil already possesses high phosphorus levels, adding more can trigger a phenomenon known as nutrient lockout. Excess phosphorus alters soil chemistry, preventing plants from absorbing other critical micronutrients like iron and zinc. Furthermore, over-application can disrupt beneficial mycorrhizal fungi networks in the soil.
Managing Unwanted Wildlife and Pets
Because homemade bone meal originates from kitchen meat scraps, it retains a faint, distinct scent that is nearly imperceptible to humans but incredibly enticing to animals. Dogs, raccoons, opossums, and rodents are notorious for digging up garden beds looking for the “buried bone” they smell.
To protect your plants from curious paws:
Always mix the powder thoroughly into the soil rather than leaving it exposed on the surface.
Cover freshly amended garden areas with a thick layer of wood mulch or compost to mask the aroma.
If necessary, temporary wire mesh or row covers can be placed over new beds for a week or two until the scent dissipates.
Conclusion: Closing the Sustainability Loop
Repurposing kitchen bone scraps into homemade fertilizer is one of the most rewarding ways to minimize household waste while directly investing in the health of your backyard ecosystem. By taking a material that is usually destined for the garbage bin and transforming it into a slow-release, calcium-rich nutrient source, you close the loop on sustainability. Your soil becomes richer, your root systems grow stronger, and your harvests become more bountiful—all thanks to a simple kitchen scrap given a second lease on life.
Frequently Asked Questions
Can I use bones from any animal to make DIY bone meal?
Yes. Chicken, turkey, pork, and beef bones are all excellent candidates for making bone meal. Chicken and poultry bones are generally thinner and much easier to break down, making them ideal for beginners. Just ensure you thoroughly boil and clean whatever scraps you use to strip away fats and marrow.
How long does it take for homemade bone meal to start working in the soil?
Because it is an organic, unrefined product, bone meal acts as a slow-release fertilizer. It typically takes anywhere from several weeks to a few months to fully break down and become bioavailable to plants, depending on your soil’s microbial activity, moisture levels, and temperature.
Is bone meal safe to use around household pets like dogs?
While pure bone meal is natural, the scent can entice dogs to ingest it or dig up your garden. Consuming large quantities of dry bone meal powder can cause the mixture to form a solid, brick-like mass in a dog’s stomach, leading to severe digestive blockages. Always mix it deeply into the soil and cover the area well if you have curious pets.
Can I use bone meal if my garden soil is alkaline?
Bone meal is highly inefficient in soils with a pH above 7. In alkaline soils, the plant roots cannot easily break the chemical bonds holding the phosphorus. If your soil test reveals a high pH, you should focus on lowering the pH using agricultural sulfur or organic compost before applying bone meal.
What is the difference between bone meal and blood meal?
Though they sound similar and are both organic animal byproducts, they serve opposite purposes. Bone meal is high in phosphorus and calcium, focusing entirely on root development, flowering, and fruiting. Blood meal is a dried powder made from blood that is exceptionally high in nitrogen, used primarily to boost rapid, vibrant green vegetative leaf growth. Pairs of these amendments are often used together to balance out garden beds.