Table of Contents
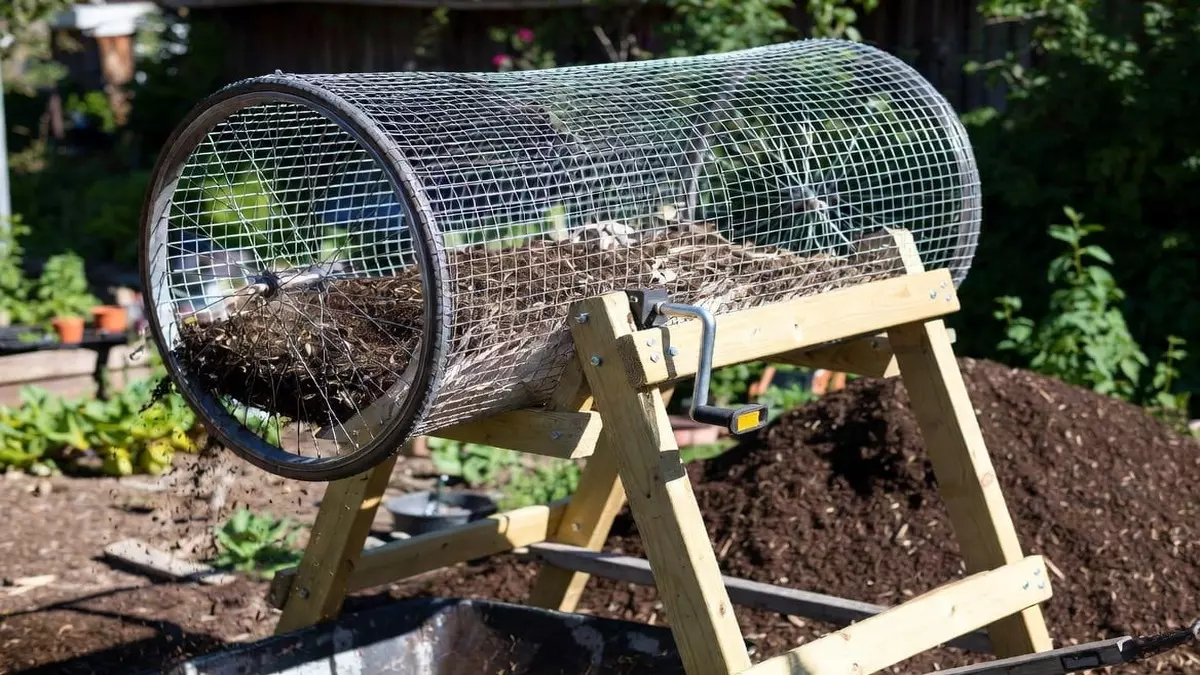
**DIY Bicycle Wheel Compost Sifter: Easy Weekend Project**
Gardeners everywhere know the frustration of dealing with lumpy, unfinished compost full of twigs and stones. A well-built rotating compost sifter changes that completely. This clever DIY project turns an old bicycle wheel, some scrap wood, and wire mesh into a smooth-operating tool that quickly separates rich, fine compost from larger materials. Best of all, it costs very little and delivers professional-level results in your backyard.
Whether you’re an experienced homesteader or just starting your composting journey, this bicycle wheel compost sifter makes screening soil and finished compost faster and more enjoyable. No more back-breaking shaking of heavy screens. Just load, crank, and watch the good stuff fall through.
DIY Bicycle Wheel Compost Sifter Easy Weekend Project

### Why a Rotating Compost Sifter Beats Traditional Methods
Manual compost screening takes time and effort. Traditional flat screens require constant lifting and shaking, which can be tough on your body. A rotating sifter solves this by using gravity and gentle tumbling motion to do the work for you.
This design offers several advantages:
– **Efficiency**: Process larger batches in minutes rather than hours.
– **Ergonomics**: Crank it while standing comfortably instead of bending over.
– **Customization**: Adjust the angle slightly so material flows naturally through the cylinder.
– **Durability**: Built with recycled bike parts and sturdy mesh, it stands up to regular use.

Many gardeners report that having a reliable sifter improves their overall composting success because they can return oversized materials back to the pile for further breakdown.
### Materials You’ll Need for Your DIY Compost Sifter
Gathering the right supplies keeps this project simple and budget-friendly. Most items come from your garage, local hardware store, or scrap pile.

**Core Components:**
– 1 old bicycle wheel (tire removed)
– 1 bicycle crank arm with pedal
– Bicycle sprocket or hub assembly
– Galvanized hardware cloth with ½-inch openings (avoid thin chicken wire)
– Scrap lumber for the A-frame stand
– 2 long support boards for the sides
– 4 angled legs
– 2-3 cross braces
**Fasteners and Tools:**
– Wood screws, bolts, washers
– Zip ties, hose clamps, or metal wire
– Heavy-duty staple gun and staples
– Drill, saw, wire cutters, measuring tape
– Work gloves and safety glasses
### Step-by-Step: Building Your Bicycle Wheel Compost Sifter
#### Constructing the Sturdy A-Frame Base
Start with a solid foundation. Cut four legs to equal length, roughly 4 to 5 feet long. Angle them outward to create a stable A-shape on each side. Secure the legs with screws and add horizontal cross braces for rigidity.
The stand needs enough width to accommodate your mesh drum and height to allow a wheelbarrow or bin underneath. Aim for about 3 feet wide at the base. This prevents tipping when the drum is full and rotating.
#### Installing Side Support Boards
Attach long wooden boards along both sides of the frame. These act as rails that support the rotating cylinder. Position them at the same height and consider a very gentle slope (about 5-10 degrees) from back to front. This subtle angle helps material move through the drum naturally as you turn it.
#### Creating the Mesh Drum Cylinder
Roll the galvanized hardware cloth into a cylinder approximately 24-30 inches in diameter. Match this size to your bicycle wheel for a perfect fit. Overlap the seam by 3-4 inches and fasten it securely with zip ties or wire every few inches. The stronger the seam, the longer your sifter will last under the weight of wet compost.
#### Attaching the Bicycle Wheel
Position the bicycle wheel on one end of the mesh cylinder. Secure the mesh to the rim at multiple points using hose clamps or heavy wire. This creates a strong, round end that rolls smoothly. Take time to center everything properly—uneven attachment causes annoying wobble during operation.
#### Reinforcing the Loading End
The opposite end stays open for easy loading. Add a wooden or metal ring for support by bending the mesh edges inward or attaching a circular frame. This prevents the cylinder from collapsing under heavy loads while keeping the opening wide enough for a shovel.
#### Adding the Crank Mechanism
Mount the bicycle hub through the wooden frame so the wheel spins freely. Connect the crank arm and pedal on the outside. This simple hand-crank system gives you excellent control over rotation speed. Test the motion early to ensure smooth turning without rubbing against the wood.
#### Mounting and Stabilizing the Drum
Place the completed mesh cylinder onto the frame. Use wooden guides or brackets to keep it aligned without creating too much friction. A small gap allows free rotation while preventing sideways movement.
Add extra cross braces at the bottom of the legs for stability. Rubber feet or wooden pads help grip the ground, especially on uneven garden soil.
#### Safety and Finishing Touches
Carefully trim all sharp wire ends and bend them inward. Cover rough spots with tape or rubber edging to protect your hands and clothing. These small details make the tool much more pleasant to use over time.
### How to Use Your New Compost Sifter Effectively
Position a wheelbarrow or tarp beneath the drum. Add 2-3 shovels of compost through the open end. Turn the crank at a steady, moderate pace. Fine particles drop through the mesh while sticks, stones, and unfinished matter stay inside.
Empty the remaining material back into your active compost pile. Over several weeks, you’ll notice your finished compost becomes consistently finer and cleaner, perfect for seed starting and delicate plants.
### Maintenance Tips to Extend the Life of Your Sifter
Store the sifter under cover when not in use to protect wood from weathering and metal from rust. Check fasteners seasonally and re-tighten as needed. A quick spray of lubricant on moving parts keeps the crank turning smoothly.
For heavy use, consider adding a second support ring around the middle of the cylinder. This prevents sagging over years of service.
### Creative Variations and Upgrades
Once you build the basic version, you can customize:
– Add a larger wheel for easier cranking
– Use stainless steel hardware for extra longevity in wet climates
– Build a dual-drum system for higher volume processing
– Paint the wooden frame for weather resistance and style
Many gardeners integrate their sifter directly into their composting workflow, placing it between finishing and storage areas.
### The Satisfaction of Building Your Own Tools
Creating this bicycle wheel compost sifter connects you with the joy of resourceful making. It turns potential landfill items into a valuable garden asset while saving money compared to commercial tumblers or screeners.
With basic tools and a weekend’s work, you’ll have a custom solution tailored to your space and needs. The gentle tumbling action produces beautifully screened compost that makes your garden thrive.
Ready to build yours? Gather those bike parts and scrap wood, and enjoy the process of creating something truly useful for your garden.
### FAQ: DIY Bicycle Wheel Compost Sifter
**How big should I make the mesh drum?**
Most gardeners find 24-30 inches in diameter and 3-4 feet long works well. This size balances capacity with easy rotation and fits nicely on a standard A-frame stand.
**What type of mesh works best?**
Galvanized hardware cloth with ½-inch openings is ideal. It handles the weight of compost without stretching and provides the perfect screening size for most garden applications.
**Can I use this for soil screening too?**
Absolutely. It works excellently for removing rocks and debris from garden soil or potting mixes. Just make sure the material isn’t too wet to avoid clogging the mesh.
**How long will this sifter last?**
With proper care and galvanized materials, it can easily last 5-10 years or more. Storing it out of direct weather exposure significantly extends its lifespan.
**Is this project beginner-friendly?**
Yes! Basic woodworking and measuring skills are enough. The design forgives small imperfections, and the bicycle parts make the mechanical portion surprisingly simple.
**What if my compost is very wet?**
Let it dry out slightly before sifting. Wet material tends to clump and stick to the mesh. Turning it more slowly helps prevent clogging during damp conditions.
This DIY bicycle wheel compost sifter brings efficiency and satisfaction to your composting routine. Start building today and enjoy finer, cleaner compost all season long. Your garden will thank you.