
Table of Contents
- 1. 1. The Source Stem Was Weak or Aging
- 1.1. The Fix: Choose Vibrant, Young Growth
- 2. 2. You Missed the Node
- 2.1. The Fix: Locate and Submerge the Node
- 3. 3. Poor Water Quality and Stagnation
- 3.1. The Fix: Use Purified Water and Flush Regularly
- 4. 4. Light Levels Are Improperly Balanced
- 4.1. The Fix: Provide Bright, Indirect Light
- 5. 5. Cool Ambient Temperatures Are Halting Growth
- 5.1. The Fix: Find the Tropical Sweet Spot
- 6. 6. Overcrowding in a Single Container
- 6.1. The Fix: Give Cuttings Room to Breathe
- 7. 7. A Need for Basic Patience
- 7.1. The Fix: Let Nature Take Its Course
- 8. Summary Checklist for Pothos Success
- 9. Frequently Asked Questions
- 9.1. Can I transfer my pothos cuttings directly into soil once they root?
- 9.2. Why did the bottom of my pothos cutting turn black and mushy?
- 9.3. Should I use rooting hormone powder for pothos water propagation?
- 9.4. Can I leave my pothos growing in water permanently?
- 9.5. Is it better to propagate pothos in water or directly in soil?
Why Your Pothos Cuttings Aren’t Rooting and How to Fix It
Propagating a pothos (Epipremnum aureum) is widely considered one of the easiest, most rewarding projects a houseplant enthusiast can tackle. Under ideal conditions, you simply snip a vine, drop it in a jar of water, and watch a network of delicate white roots develop within weeks.
But what happens when the magic doesn’t work? Instead of bursting with growth, your cuttings sit idle for weeks. Stems remain bare, leaves look sad, and you are left wondering where your green thumb went.
If your propagation project has stalled, do not give up. Pothos are incredibly resilient tropical plants. When they refuse to push out roots, it is almost always due to a few common, easily correctable environmental stressors. Here are seven reasons your pothos cuttings aren’t rooting and the exact strategies to fix them.
Why Your Pothos Cuttings Aren’t Rooting and How to Fix It
1. The Source Stem Was Weak or Aging
A cutting is entirely dependent on the energy stored within its tissues to generate new root systems. If you take a snippet from an old, woody, leafless stem, or a vine that is already yellowing from nutritional deficiencies, the cutting lacks the vitality to propagate. It will expend its remaining resources simply trying to stay alive, leaving zero energy for root development.
The Fix: Choose Vibrant, Young Growth
Always harvest your cuttings from healthy, actively growing vines. Look for lush green tips with vibrant, unblemished leaves. A perfect cutting consists of a firm stem segment with two to three leaves and at least one healthy, dark node.
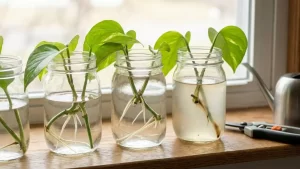
2. You Missed the Node
This is the number one mistake beginners make when propagating trailing plants. If you cut only a leaf stem (the petiole) and place it in water, it may stay green for months, but it will never grow roots.
   LEAF
    |
    |  <-- Petiole (Will NOT root)
    |
 [ NODE ] <-- The small brown bump/joint (Roots emerge HERE!)
    |
    |  <-- Cut 1/4 inch below this point
Roots emerge from highly specialized cells located exclusively within the node—the swollen joint or bump on the vine where a leaf meets the stem.
The Fix: Locate and Submerge the Node
Examine your vine before cutting. Look for the small, raised brown bumps or aerial root nubs. Make your clean snip roughly a quarter-inch below a node. When you place the cutting in your propagation vessel, that exact node must remain completely submerged in water or tucked firmly beneath the surface of your soil.
3. Poor Water Quality and Stagnation
While tap water looks perfectly clean, it often contains dissolved chlorine, chloramines, fluoride, and heavy minerals that can chemical-burn raw plant tissue. Furthermore, if you leave a cutting in the same water for weeks on end, the liquid loses its dissolved oxygen and turns into a breeding ground for harmful anaerobic bacteria, causing the stem to rot.
The Fix: Use Purified Water and Flush Regularly
To give your cuttings the best environment, use rainwater, distilled water, or tap water that has sat out uncovered for 24 hours to let dissolved gases dissipate.
Refresh schedule: Change the water completely every 3 to 4 days.
Sanitation: Each time you change the water, gently rinse the base of the stem to remove any slick bio-film, and wash out the glass jar with warm water. Clean water ensures a highly oxygenated environment where roots thrive.
4. Light Levels Are Improperly Balanced
Light is the fuel that powers photosynthesis, providing the sugars necessary for cellular division and root creation. If your cuttings are tucked away in a dark corner of a room, the biological engine turns off and growth halts. Conversely, placing the propagation jar on a scorching, sun-drenched windowsill will overheat the water, cook the stems, and bleach the leaves.
The Fix: Provide Bright, Indirect Light
Position your propagation station in a location that receives abundant, filtered sunlight. Ideal spots include:
A few feet away from a bright south- or west-facing window.
Directly on an east-facing windowsill where the morning sun is gentle.
Beneath a low-intensity LED grow light set to run for 8 to 10 hours a day if your home lacks natural light.
5. Cool Ambient Temperatures Are Halting Growth
Pothos are native to the warm, humid jungles of French Polynesia. They are biologically programmed to grow rapidly when conditions are warm and to go dormant when temperatures plunge. If your home drops below 65°F (18°C), or if your cuttings are sitting near a drafty winter window or air conditioning vent, the internal metabolism of the plant slows to a crawl.
The Fix: Find the Tropical Sweet Spot
Keep your propagation vessel in a consistently warm room where temperatures stay between 70°F and 85°F (21°C to 29°C).
Pro-Tip: If you are trying to propagate during the colder winter months, place your glass jar on top of an inexpensive waterproof seedling heat mat. Providing gentle, bottom-up warmth directly to the water will dramatically accelerate the emergence of root initials.
6. Overcrowding in a Single Container
It is tempting to place a massive bundle of green vines into a single decorative vase. However, stuffing too many stems together limits the amount of physical space and oxygen available to each cutting. Overcrowded leaves block light from reaching neighboring stems, and jammed nodes press against each other, trapping bacteria and drastically increasing the likelihood of widespread stem rot.
The Fix: Give Cuttings Room to Breathe
Limit your propagation vessels to three or four cuttings max, depending on the size of the container opening. Ensure that the leaves remain completely elevated above the water line while the bare nodes sit comfortably below. If you have a long vine to propagate, distribute the pieces across multiple small jars so every single cutting has unfettered access to light and moving water.
7. A Need for Basic Patience
If your cutting is vibrant green, the stem feels firm, and the node is not mushy or black, your plant is perfectly healthy—it is simply working on its own timeline. Plant genetics, seasonal transitions, and micro-climates all dictate growth rates.
| Phase | Timeline | What to Expect |
| Phase 1 | Weeks 1–2 | Stem acclimates; callousing over the cut tip. |
| Phase 2 | Weeks 2–4 | Small white root initials/nubs break through the node. |
| Phase 3 | Weeks 4–6 | Secondary roots branch out; ready for soil transition. |
The Fix: Let Nature Take Its Course
Step back and let the plant work. As long as you are keeping the water fresh and providing indirect light, do not worry if you don’t see immediate results. Once those initial white nubs finally break through the skin of the node, root growth accelerates rapidly.
Summary Checklist for Pothos Success
Before you throw out an stubborn cutting, run through this quick troubleshooting checklist:
[ ] Is there a node? Make sure you didn’t just cut a single leaf stem.
[ ] Is the node underwater? Keep the joint completely submerged.
[ ] Is the water clear? Change it twice a week to maximize oxygen levels.
[ ] Is the spot bright enough? Move it closer to a filtered window.
[ ] Is the room warm enough? Keep the environment above 70°F (21°C).
Frequently Asked Questions
Can I transfer my pothos cuttings directly into soil once they root?
Yes. Once the newly formed roots reach about two to three inches in length and begin growing secondary lateral roots, they are ready for potting soil. Use a light, well-draining potting mix containing perlite, water it thoroughly after planting, and keep the soil slightly damp for the first two weeks to help the water-adapted roots adjust to the dirt.
Why did the bottom of my pothos cutting turn black and mushy?
A black, mushy stem is a clear indicator of stem rot caused by bacteria or fungi. This occurs when water is left stagnant for too long, or if the cutting was compressed in an overcrowded jar. Cut away the rotted, mushy section with sterile shears, wash the jar thoroughly, fill it with fresh water, and try again with the remaining healthy portion of the stem.
Should I use rooting hormone powder for pothos water propagation?
While rooting hormones are excellent for woody outdoor shrubs or difficult indoor plants, they are completely unnecessary for pothos. Pothos naturally contain high concentrations of auxin, a plant hormone responsible for root development. In fact, applying synthetic powder to a water cutting can often gum up the node and restrict clean water absorption.
Can I leave my pothos growing in water permanently?
Yes, pothos can live in water long-term, a method often called hydroponic growing. However, because water lacks natural nutrients, a plant grown purely in liquid will develop much slower and produce smaller leaves over time. If you choose to keep it in water permanently, you will need to add a few drops of a liquid, water-soluble fertilizer to its container every month.
Is it better to propagate pothos in water or directly in soil?
Both methods are highly effective, but water propagation is favored by most hobbyists because it allows you to physically monitor root growth and catch rot early. Soil propagation skips the delicate “transplant shock” phase when moving a plant from water to dirt, but requires you to keep the soil consistently damp without overwatering, which can be trickier to balance.