Table of Contents
**How to Build a $300 DIY Walkthrough Shelter**
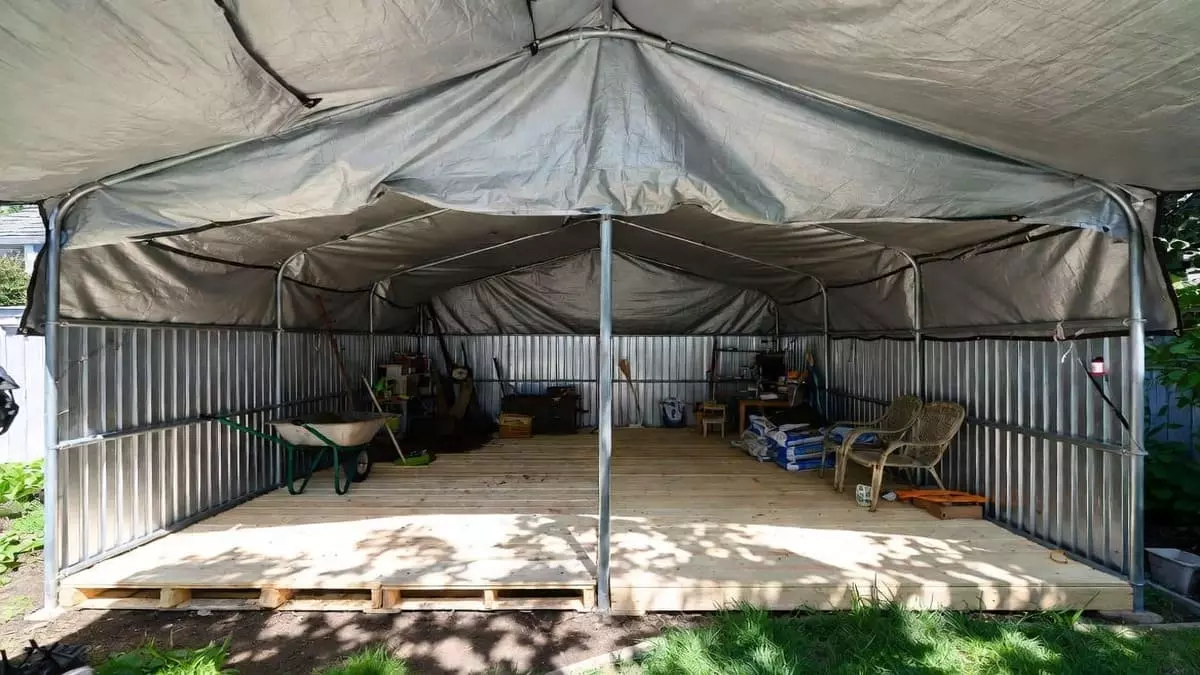
Tired of cluttered garages and overpriced storage sheds? I recently tackled a project that solved my outdoor storage problems without draining my wallet. For just $300, I built a spacious 16×20 walkthrough shelter that’s sturdy, functional, and surprisingly attractive. This budget-friendly DIY shelter now gives me dedicated space for gardening tools, outdoor furniture, potting projects, and even a shady spot to relax.
If you’re looking for an affordable way to create extra covered space in your backyard, this simple design delivers excellent results. Using recycled pallets, T-posts, cattle panels, and a heavy-duty tarp, the entire build stays lightweight yet strong enough to handle weather and daily use.
How to Build a $300 DIY Walkthrough Shelter

### Why a Walkthrough Shelter Makes Perfect Sense
Many homeowners need extra storage but don’t want to spend thousands on a pre-built shed. A walkthrough shelter offers the ideal middle ground. Unlike traditional sheds with narrow doors, this open-ended design lets you walk straight through, making it easy to move wheelbarrows, lawn equipment, or bags of mulch.
Beyond storage, this versatile structure works as a potting station, shaded workspace, or even a casual hangout area during nice weather. The cattle panel walls provide airflow while keeping larger items secure, and the tarp roof protects everything inside from rain, sun, and debris.

Building it myself allowed full customization to fit my exact needs and property layout. The total cost came in at around $300, proving you don’t need expensive kits or contractor help to create something truly useful.
### Materials Needed for This Budget Build
Smart sourcing keeps costs extremely low. I focused on free and affordable materials that are easy to find locally.

**Free Items:**
– 8 wooden pallets – Sourced for free from a local warehouse. Pallets offer incredible strength and save a fortune on framing lumber.
**Purchased Materials:**
– 16 T-posts ($4.99 each) – These heavy-duty metal posts create the main vertical support.
– 5 cattle panels ($26.99 each) – Strong galvanized panels form durable walls.
– One 16×20 heavy-duty agricultural tarp ($64.99) – Provides reliable weatherproof roofing.
– 16 U-bolts ($1.29–$2.99 each) – Essential for securely attaching panels to posts.
**Basic Tools Needed:**
Hammer or post driver, drill, wrenches, wire cutters, level, and measuring tape. Most DIYers already own these items.
Total cost stayed right around $300 by shopping sales and using free pallets.
### Step-by-Step Guide to Building Your Walkthrough Shelter
#### Step 1: Choose and Prepare the Building Site
Start by selecting a relatively flat area in your yard. Clear away grass, rocks, and debris. Use a level to check the ground and make minor adjustments with fill dirt if needed. Proper site preparation prevents future settling and keeps your shelter stable for years.
I chose a spot near my garden for convenient access to tools and supplies.
#### Step 2: Set the Foundation Posts
Drive the T-posts into the ground to form the perimeter of your 16×20 shelter. Space them evenly — roughly every 4 feet — for maximum strength. Pay special attention to the corners, as they bear the most stress. Use a post driver or sledgehammer, making sure each post sits straight and at the same height.
#### Step 3: Build the Base with Pallets
Position the free pallets across the base to create a solid, elevated floor platform. Secure them to the T-posts using heavy screws or brackets. The pallets add height to keep stored items off damp ground and provide a stable foundation for the walls.
This recycled base also improves airflow underneath, which helps prevent moisture buildup.
#### Step 4: Install the Cattle Panel Walls
Attach the cattle panels to the T-posts using U-bolts. Tighten them firmly so the walls feel solid and won’t flex in wind. These panels give the shelter excellent rigidity while allowing light and air to flow through — perfect for storing tools that need ventilation.
I placed panels on three sides, leaving the ends open for the walkthrough design. This creates easy access from both directions.
#### Step 5: Add the Tarp Roof
Stretch the 16×20 agricultural tarp over the top of the frame. Pull it tight to eliminate sagging, then secure the edges to the T-posts and panels with additional U-bolts, zip ties, or bungee cords. Double-check that water will run off properly instead of pooling in the center.
This heavy-duty tarp stands up well to sun exposure and light rain, protecting everything stored underneath.
#### Step 6: Final Reinforcement and Finishing
Add extra bracing where needed, especially at corners. Walk through the shelter multiple times to test stability. Trim any sharp edges on the panels for safety.
### Benefits of This Budget Walkthrough Shelter
The finished 16×20 structure gives me more than enough room for all my gardening supplies, extra chairs, and small project materials. The open design makes loading and unloading effortless compared to traditional sheds.
Because it’s built with durable materials like cattle panels and T-posts, it handles wind and weather better than I expected. The entire project took just a weekend of work, and I saved hundreds — even thousands — compared to buying a ready-made shelter.
### Smart Tips for Your Own Budget Shelter Project
– Hunt for free pallets early. Many businesses give them away to avoid disposal fees.
– Check for sales on T-posts and panels at farm supply stores.
– Always level your site thoroughly before installing posts.
– Consider adding optional side curtains or additional tarps for extra weather protection in harsh climates.
– Use pressure-treated wood or sealant on pallets if you live in a very wet area.
### Final Thoughts
Building this $300 DIY walkthrough shelter proved that you can create quality outdoor space without spending a fortune. The combination of recycled pallets, strong metal framing, and a reliable tarp delivers a structure that’s both practical and long-lasting.
Whether you need tool storage, a garden workspace, or flexible covered area, this design adapts to many uses. The sense of accomplishment from completing it yourself makes the project even more rewarding.
Ready to create your own? Gather the materials, clear a weekend, and enjoy the extra space this budget shelter brings to your property.
### FAQ: Building a Budget Walkthrough Shelter
**How much does this shelter really cost to build?**
The complete project typically runs $250–$350 depending on local prices and whether you find free pallets. My total came to right around $300.
**Is this shelter strong enough for heavy wind or snow?**
Yes, when properly secured. The T-posts and cattle panels create a robust frame. In areas with heavy snow, consider reinforcing the center or using a stronger tarp.
**Can I make the shelter larger or smaller?**
Absolutely. The 16×20 size works well for most needs, but you can adjust dimensions by adding more posts and panels. Just maintain even spacing for stability.
**Do I need concrete footings for the posts?**
Not necessary for this design. Driving T-posts directly into the ground works well for most soil types and keeps costs low. Use concrete only in very loose or sandy soil.
**What can I store in this type of shelter?**
It’s ideal for gardening tools, lawn equipment, outdoor furniture, firewood, potting supplies, and bikes. The open airflow makes it better for items that don’t like being fully enclosed.
**How long does this shelter last?**
With quality tarp and galvanized materials, it can easily last 5–8 years. Replacing the tarp every few years extends the overall life significantly.
This straightforward approach shows anyone can build practical backyard structures on a tight budget. Start planning your own shelter today and enjoy the extra space and organization it provides.