Table of Contents
- 1. Step 1: Select the Perfect Specimen
- 1.1. Prioritize Pliable, Young Growth
- 1.2. Choose the Right Variety
- 1.3. Look for Center Symmetry
- 2. Step 2: Establish a Sturdy Internal Support Frame
- 2.1. Select Your Guide Material
- 2.2. Secure the Frame Without Root Damage
- 3. Step 3: Curve and Fasten the Foliage
- 3.1. Choose Non-Abrasive Fasteners
- 3.2. Guide the Leaves Incrementally
- 4. Step 4: Environmental Tweaks for Uniform Curvature
- 4.1. Maximize Bright, Indirect Light
- 4.2. Execute Weekly Rotations
- 4.3. Utilize Morning Misting
- 5. Step 5: Don’t Forget Essential Succulent Care
- 6. Step 6: Transitioning to a Free-Standing Sculpture
- 7. Frequently Asked Questions
- 7.1. Can I train any variety of snake plant into a spiral shape?
- 7.2. How long does it take to permanently train a snake plant into a circle?
- 7.3. Will misting my snake plant cause the leaves to rot?
- 7.4. What should I do if a leaf cracks slightly while I am bending it?
- 7.5. Why is my trained snake plant losing its bright yellow variegation?
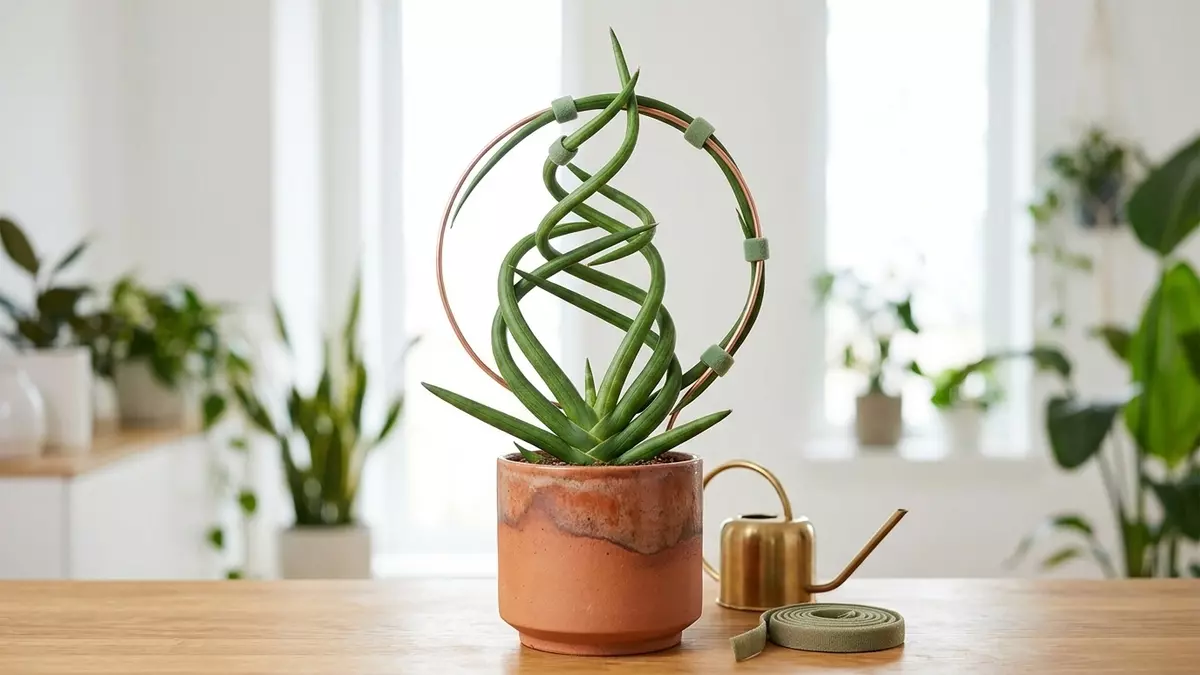
How to Sculpt Your Snake Plant Into a Spiral or Circular Shape
With their tall, architectural, sword-like leaves, snake plants (historically classified as Sansevieria, now technically part of the Dracaena genus) are celebrated for their sleek verticality and rugged simplicity. Yet, every so often, you might spot a specimen with foliage gracefully curling into a tight spiral or an elegant circular orbit.
While it looks like an exotic mutation or a trick played by nature, this striking visual form is actually the result of patient, mindful plant training. By working in harmony with the plant’s natural cellular development, you can gently guide its structural growth over time. Here is the step-by-step methodology to transform a standard household snake plant into a living, spiraling piece of botanical art.

How to Sculpt Your Snake Plant Into a Spiral or Circular Shape
Step 1: Select the Perfect Specimen
The success of your living sculpture depends entirely on the age and structural variety of the plant you choose to start with. Attempting to bend a mature, fully established snake plant will result in immediate failure, as older leaves are thick, rigid, and prone to cracking or snapping under pressure.
Prioritize Pliable, Young Growth
Always begin your shaping journey with a young, actively developing snake plant. Young leaves possess soft, flexible plant tissue that can easily adjust to physical steering without sustaining permanent structural cell damage.
Choose the Right Variety
While many enthusiasts naturally gravitate toward Sansevieria cylindrica (the African Spear plant) due to its smooth, tubular, rod-like leaves that lend themselves perfectly to braiding and looping, you can achieve beautiful results with flat-leafed varieties as well. Varieties like Dracaena trifasciata ‘Laurentii’ (with its iconic yellow margins), ‘Zeylanica’ (featuring dark, mottled patterns), and even the compact, rosette-forming ‘Hahnii’ are highly responsive to training when young.
Look for Center Symmetry
Pick a specimen that boasts a tight, centralized, and symmetrical growth habit. A well-balanced base ensures that as you begin to manipulate the exterior leaves, the core remains firmly anchored in the potting soil. Avoid lanky, structurally weak, or drooping plants, as their irregular growth makes it incredibly difficult to establish a clean, uniform geometric pattern.

Step 2: Establish a Sturdy Internal Support Frame
A snake plant cannot hold a curve on its own during its initial growth phase. To dictate the trajectory of the spiral, you must introduce a physical skeleton into the container.
Select Your Guide Material
You have several creative options for building a support track:
A pre-fabricated commercial spiral metal trellis.
A customized frame shaped by hand using thick, vinyl-coated or foam-insulated garden wire.
A mini tomato cage modified to narrow down toward the base.

Ensure whatever material you select is strong enough to resist the outward pushing pressure of the growing leaves while remaining flexible enough for you to adjust its diameter as the plant matures.
Secure the Frame Without Root Damage
Gently slide the legs of your support frame down into the potting mix. To prevent spearing the plant’s delicate underground rhizomes and roots, insert the stakes slowly near the inside edge of the pot rim, then angle the upper tracking guide so it aligns perfectly with the central core of the plant. The framework should sit close to the emerging foliage, acting as a supportive companion rather than a restrictive cage.
Step 3: Curve and Fasten the Foliage
Once your frame is locked into position, you can begin the physical process of redirecting the leaves. This requires a gentle touch and a gradual timeline.
[Select Most Flexible Leaf] ──> Apply Gentle Tension ──> Secure with Soft Plant Ties ──> Repeat with New Growth
Choose Non-Abrasive Fasteners
Never use thin plastic twist-ties, bare metal wires, or tight rubber bands to secure your snake plant. These materials will slice into the thick, waxy skin of the foliage as the leaves expand, leaving behind permanent, ugly brown scars or inviting bacterial rot. Instead, use soft, adjustable plant fasteners, such as specialized hook-and-loop garden tape (Velcro strips), thick foam-coated training wire, or wide strips of soft cotton cloth.
Guide the Leaves Incrementally
Identify the longest, healthiest, and most flexible leaves on your plant. Slowly and carefully curve them along the path of your support frame. Secure each leaf to the track at multiple points along its length to distribute the bending tension evenly across the entire stem rather than concentrating the stress at a single, vulnerable pivot point.
Do not force the leaf into a completed, radical loop on day one. If you encounter rigid resistance, fasten the leaf at a mild angle, let it adjust to the tension for a couple of weeks, and then tighten the tie slightly to deepen the curve over time. As new center leaves emerge, repeat the process, weaving them into the established circular pattern.
Step 4: Environmental Tweaks for Uniform Curvature
Because you are forcing the plant to grow in an unnatural pattern, you must optimize its environment to keep the foliage cooperative and healthy.
Maximize Bright, Indirect Light
Place your trained snake plant in a location that receives ample bright, indirect sunlight. While these plants can tolerate low-light conditions, their growth rate drops dramatically in dark rooms. Increased light values drive the cellular energy required to fuel new growth, allowing the plant to lock into its custom shape much faster.
Execute Weekly Rotations
Plants naturally bend toward their primary light source—a biological process known as phototropism. If you leave your pot in one position, the leaves will break out of their trained spiral to lean toward the nearest window, warping your geometric design. Rotate the container exactly 90 degrees clockwise every single week to ensure all sides of the spiral receive completely equal light exposure.
Utilize Morning Misting
While snake plants thrive in dry indoor environments, maintaining a slightly humid microclimate during the active training window can be highly beneficial. Give the foliage a light misting with distilled water early in the morning. This subtle hydration keeps the outer cell walls of the leaves elastic, making them more pliable and far less likely to resist tension.
Step 5: Don’t Forget Essential Succulent Care
A sick, overwatered, or nutrient-starved snake plant will lose its cellular turgor pressure, causing the leaves to become soft, wrinkled, and physically incapable of holding a structured shape.
| Care Component | Ideal Standard | Training Impact |
| Water Frequency | Every 2 to 4 weeks (Only when soil is bone dry) | Prevents cellular waterlogging and structural root rot. |
| Soil Medium | Coarse, fast-draining cactus/succulent mix | Encourages strong, anchored root systems around the frame. |
| Fertilization | Half-strength balanced liquid fertilizer monthly | Supplies nutrients required to build flexible cell wall structures. |
| Pot Selection | Heavy terra cotta with wide drainage holes | Lowers center of gravity to prevent the styled top-heavy plant from tipping. |
The golden rule of snake plant care is to avoid overwatering at all costs. Excessive moisture chokes out the roots, causing the lower stems to turn to mush, which will instantly destroy months of careful shaping work.
Step 6: Transitioning to a Free-Standing Sculpture
After months of continuous guidance, the internal cellular structure of the snake plant’s leaves will permanently adapt to the curve, hardening into place.
Do not rip the support frame out all at once. Transition the plant to a free-standing state in careful stages. Begin by loosening or completely removing the topmost fasteners while leaving the lower anchors intact. Monitor the leaf for several days; if it maintains its perfect circular arc without sagging or snapping back to a vertical orientation, you can proceed to remove the next level of ties.
If a leaf begins to drift back to its natural posture, simply re-fasten it for an additional month. Once the frame is entirely removed, you will be left with a stunning, self-sustaining botanical showpiece. Even more rewarding: any new offsets or “pups” that emerge from the parent rhizome will often sprout directly into the established spiral flow of the container, leaving you with a multi-generational family of beautifully curling plants.
Frequently Asked Questions
Can I train any variety of snake plant into a spiral shape?
While most flat-leafed varieties like Dracaena trifasciata can be shaped when very young, the undisputed king of spiraling is Sansevieria cylindrica (the African Spear plant). Its round, cylindrical, tubular leaves lack the rigid margins of flat-leaf varieties, making them significantly more flexible and less prone to tearing during long-term bending.
How long does it take to permanently train a snake plant into a circle?
Because snake plants are notoriously slow indoor growers, the shaping process requires immense patience. Depending on your home’s light conditions and the youth of the plant, it typically takes anywhere from 6 to 12 months for the leaves to permanently harden into their custom geometric configurations.
Will misting my snake plant cause the leaves to rot?
Misting can cause fungal issues if done incorrectly, but a very light morning misting during the training phase helps keep leaf tissues pliable. Always mist early in the day so the excess surface water can fully evaporate before nightfall, and never allow standing water to accumulate inside the central growth rosette.
What should I do if a leaf cracks slightly while I am bending it?
If you hear a minor pop or notice a hairline surface crack, immediately halt all bending. Back off the tension on that specific leaf and wrap the wounded area with a loose piece of soft garden tape. Snake plants have excellent sealing properties; the wound will form a clean tan scar, allowing you to resume very gentle training after a couple of months of rest.
Why is my trained snake plant losing its bright yellow variegation?
If the vibrant yellow margins of a variety like ‘Laurentii’ begin to fade or turn solid green during training, your plant is not receiving enough light. Move the container closer to a bright window with indirect light, as the plant is producing excess chlorophyll to compensate for dark conditions, which will quickly stall your training progress.