Table of Contents
- 1. Understanding the Nutritional Power of Bone Meal
- 1.1. The Key Nutrients: Phosphorus and Calcium
- 1.2. Soil pH and Nutrient Availability
- 2. A Step-by-Step Guide to DIY Bone Meal
- 2.1. Equipment and Materials Checklist
- 2.2. Step 1: Deep Clean the Scraps
- 2.3. Step 2: Dehydrate Until Completely Brittle
- 2.4. Step 3: Pulverize into a Fine Powder
- 2.5. Step 4: Secure Storage
- 3. How to Safely Apply Bone Meal in the Garden
- 3.1. Individual Transplants and Bulbs
- 3.2. Established Garden Beds
- 3.3. Fruit Trees, Roses, and Ornamental Shrubs
- 3.4. Perfecting Your Application Timing
- 4. Crucial Caveats for Every Home Gardener
- 4.1. It Is Not a Balanced, All-Purpose Fertilizer
- 4.2. Avoid Over-Application
- 4.3. Managing Curious Wildlife and Pets
- 5. Maximizing Your Garden’s Potential Naturally
- 6. Frequently Asked Questions
- 6.1. Can I use bones from any type of cooked meat to make bone meal?
- 6.2. How long does it take for homemade bone meal to start feeding plants?
- 6.3. Is bone meal safe to use around household pets?
- 6.4. Can I add bone meal to my houseplants or container gardens?
- 6.5. Why shouldn’t I apply bone meal to high pH (alkaline) soils?
4 Easy Steps to Turn Kitchen Scraps Into Organic Fertilizer
Next time you finish a delicious roast chicken or beef dinner, take a close look at the leftover bones on your plate. Instead of tossing them directly into the trash or compost bin, you could be holding the secret to a thriving, high-yielding garden.
Transforming ordinary kitchen waste into a premium soil amendment is an incredibly satisfying DIY project. It allows you to reduce household waste while providing your plants with a steady source of essential nutrients.
Homemade bone meal is a time-tested, budget-friendly secret weapon for organic gardeners. It is highly effective at stimulating deep root development and encouraging spectacular floral displays.

Here is a comprehensive guide to understanding, creating, and safely utilizing this powerful organic fertilizer right in your own backyard.

4 Easy Steps to Turn Kitchen Scraps Into Organic Fertilizer
Understanding the Nutritional Power of Bone Meal
Before diving into the step-by-step creation process, it is important to understand exactly what bone meal is and how it interacts with your garden ecosystem.
The Key Nutrients: Phosphorus and Calcium
Commercial bone meal is typically created from cleaned, steamed, and pulverized livestock bones (usually cattle). This fine powder acts as an exceptional slow-release source of two critical plant nutrients:
Phosphorus ($12\%–16\%$): Unlike nitrogen, which fuels rapid above-ground leaf and stem growth, phosphorus works quietly beneath the surface. It is absolutely essential for robust root architecture, seamless water absorption, and the energy transfer required for heavy flowering and fruit production.
Calcium ($20\%–30\%$): This mineral is the fundamental building block of plant cell walls. A healthy supply of calcium prevents devastating physiological disorders, such as blossom-end rot, which frequently ruins harvests of tomatoes, peppers, and eggplants.

Soil pH and Nutrient Availability
According to research from the University of Minnesota Extension, bone meal delivers the best results when applied to acidic soils with a pH level below 7. In these environments, the soil chemistry naturally breaks down the powder, making the embedded phosphorus readily available to plant roots.
If your soil is highly alkaline (pH above 7), the nutrients remain locked up tightly, meaning your plants won’t be able to easily absorb them. It is highly favored for establishing root vegetables, perennial flower bulbs, roses, and heavy-fruiting summer crops.
A Step-by-Step Guide to DIY Bone Meal
Creating your own organic fertilizer at home requires minimal equipment. The process simply demands a bit of patience to ensure the raw materials are fully processed and safe for your soil.
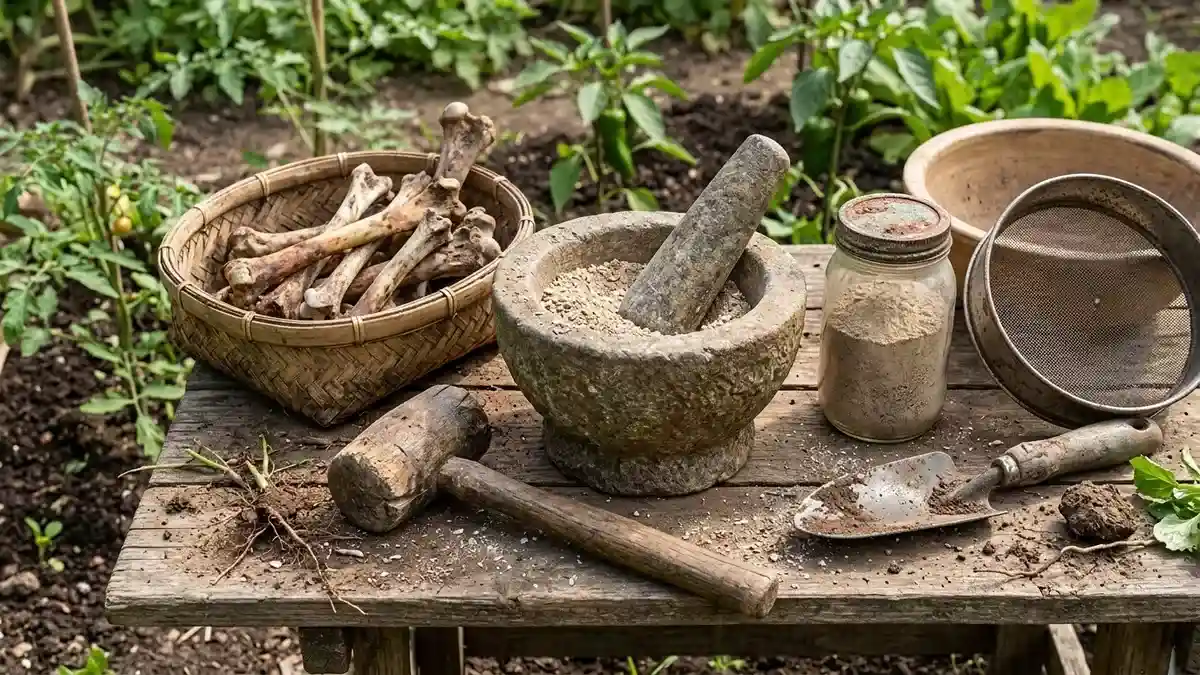
Equipment and Materials Checklist
Before you begin, gather the following household items:
Leftover animal bones (chicken, turkey, beef, or pork; avoid excessively fatty cuts)
A large stockpot for boiling
A standard baking sheet
An oven or a heavy-duty food dehydrator
A hammer, mortar and pestle, or a high-powered blender
A fine-mesh sifter
An airtight glass jar or plastic container for long-term storage
Protective gloves
Step 1: Deep Clean the Scraps
To avoid attracting unwanted pests and to ensure a clean final product, you must strip away all remaining organic tissue. Place your collected bones into a large stockpot filled with water and boil them continuously for 1 to 2 hours. This process dissolves stubborn gristle, fat, and marrow.
Pro Tip: For an even deeper clean, you can soak the boiled pieces in a mild vinegar-and-water solution. This helps strip away residual oils and begins softening the rigid structure for easier grinding later. Always wear protective gloves when handling raw or unprocessed animal products.
Step 2: Dehydrate Until Completely Brittle
Once completely clean, spread the pieces in a single layer across a sturdy baking tray. Place them into an oven preheated to 250°F (120°C) for a minimum of 3 to 4 hours.
The goal here is total moisture removal. You will know they are ready when they lose their greasy texture, take on a pale, chalky appearance, and snap easily when bent. Removing every trace of moisture is critical to preventing mold growth during storage.
Step 3: Pulverize into a Fine Powder
Let the pieces cool down completely. To protect your appliances, wrap the brittle fragments in a clean towel and use a hammer to shatter them into small, pebble-sized chunks.
Next, transfer the small pieces into a heavy-duty blender or an industrial-grade food processor. Grind the material until it reaches a fine, powdery consistency. Pass the mixture through a sifter to separate any stubborn, unground shards, and run those larger pieces through the blender one more time.
Step 4: Secure Storage
Pour your freshly ground fertilizer into a clean, airtight container. Store the jar in a cool, dark, and dry pantry. As long as it remains completely sealed and protected from environmental humidity, your homemade organic supplement will stay perfectly usable for several months.
Bonus Customization: If you want to create a more well-rounded soil amendment, consider mixing a small amount of clean wood ash (for potassium) or kelp powder (for micronutrients) directly into your finished batch.
How to Safely Apply Bone Meal in the Garden
Because this is a slow-release amendment, strategic application ensures your plants get the maximum benefit exactly when and where they need it most.
Individual Transplants and Bulbs
When tucking new seedlings, seasonal flower bulbs, or young transplants into the ground, drop roughly one tablespoon of the powder directly into the base of the dug hole. Lightly scratch the powder into the surrounding dirt so it doesn’t press directly against bare, sensitive root tissue, then water the area thoroughly to initiate the breakdown process.
Established Garden Beds
For larger outdoor growing spaces, evenly scatter a thin layer across your soil—aiming for roughly 10 pounds of powder per 100 square feet. Use a garden rake to lightly work the meal into the top 2 to 3 inches of topsoil. This uniform distribution ensures even root access and dilutes the scent.
Fruit Trees, Roses, and Ornamental Shrubs
For larger, established landscape plants, apply roughly one cup of the powder around the base of the plant. Instead of piling it against the main trunk or stem, scatter it in a wide ring along the “drip line” (the perimeter where rainwater naturally drips from the outermost leaves). Give the area a deep, generous watering to wash the nutrients down toward the active root zone.
| Application Type | Recommended Quantity | Placement Method |
| New Transplants & Bulbs | 1 tablespoon per planting hole | Mix with dirt at the bottom of the hole; avoid direct root contact. |
| Entire Garden Beds | 10 pounds per 100 square feet | Broadcast evenly and rake into the top 2–3 inches of topsoil. |
| Trees, Roses, & Shrubs | 1 cup per plant | Scatter in a wide ring along the outer drip line and water deeply. |
Perfecting Your Application Timing
Timing is everything. The absolute best times to apply this slow-acting fertilizer are early spring, when perennial plants are waking up and actively expanding their root networks, or late autumn, which gives the winter soil microbes plenty of time to break down the minerals ahead of the spring rush.
Crucial Caveats for Every Home Gardener
While this kitchen-to-garden hack offers incredible benefits, it is not a cure-all solution for every gardening issue.
It Is Not a Balanced, All-Purpose Fertilizer
It is critical to remember that this meal contains virtually zero nitrogen or potassium. If you are trying to grow heavy foliage crops like spinach, kale, lettuce, or vibrant green lawns, this supplement alone will leave your plants stunted and yellowing. You will need to complement it with other organic matter to fulfill those specific nutritional needs.
Avoid Over-Application
More is not always better. Dumping excessive amounts of phosphorus into your soil can trigger a negative chemical reaction known as nutrient lockout, which ironically prevents your plants from absorbing other vital micronutrients like iron and zinc. Conducting a basic soil test before applying heavy amendments is always the smartest move.
Managing Curious Wildlife and Pets
The distinct, rich aroma of ground animal bones is incredibly alluring to domesticated dogs, local raccoons, coyotes, and rodents. To keep curious animals from digging up your pristine garden beds, always bury the powder deep within the soil profile and immediately cover the newly amended areas with a thick, protective layer of wood mulch or compost.
Maximizing Your Garden’s Potential Naturally
Repurposing dinner scraps into a potent soil amendment is a rewarding way to embrace zero-waste living while saving money on commercial garden inputs. By carefully cleaning the bones, processing them into a fine powder, and applying them strategically to acid-loving plants, you provide a gentle, long-lasting reservoir of phosphorus and calcium. Keep an eye on your soil’s pH, protect your beds from curious critters, and enjoy watching your garden flourish from the ground up.
Frequently Asked Questions
Can I use bones from any type of cooked meat to make bone meal?
Yes. Bones from chicken, turkey, beef, pork, or even wild game work beautifully. The most critical step is ensuring that all fat, meat, and marrow are entirely boiled away and that the pieces are baked until completely dry to prevent rot and foul odors.
How long does it take for homemade bone meal to start feeding plants?
Because it is an organic, coarse powder, it relies on soil microbes and moisture to break down slowly. It generally takes anywhere from several weeks to a few months to become fully bioavailable to your plants, making it an excellent long-term soil builder rather than an instant fix.
Is bone meal safe to use around household pets?
While the nutrients are excellent for plants, the raw scent can entice dogs to ingest the soil. Consuming large quantities of bone meal can create a thick, cement-like paste in a dog’s stomach, leading to severe digestive blockages. Always mix it thoroughly into the dirt and cover the area with mulch to deter pets.
Can I add bone meal to my houseplants or container gardens?
Absolutely. It works wonderfully for potted flowers, indoor succulents, and container-grown tomatoes. Just be mindful of the quantity—a light teaspoon mixed into the potting soil during spring repotting is usually more than enough for small containers.
Why shouldn’t I apply bone meal to high pH (alkaline) soils?
When soil pH climbs above 7, the calcium and phosphorus molecules bind together so tightly that they become chemically insoluble in water. Even if you add a large amount of the powder to alkaline soil, the plant roots will remain unable to extract the nutrients until the soil pH is lowered.