Table of Contents
- 1. Why Wooden Pallets Transform Watermelon Growing
- 1.1. Superior Drainage and Aeration
- 1.2. Enhanced Heat Retention
- 1.3. Protection from Common Ground Spoilage
- 2. How to Sourced and Safely Select Your Garden Pallet
- 2.1. Deciphering International Pallet Stamps
- 3. Top Watermelon Varieties Tailored for Compact Spaces
- 4. Setting Up Your Pallet Garden Step-by-Step
- 4.1. Step 1: Install the Fabric Barrier
- 4.2. Step 2: Mix and Pour Premium Soil
- 4.3. Step 3: Angle for Optimal Sunlight
- 5. Planting and Caring for Your Vines
- 5.1. Smart Vertical and Trellis Support
- 5.2. Precise Watering Protocols
- 5.3. The Flower Fertilizer Shift
- 6. Defending Against Pests and Diseases Naturally
- 7. Mastering the Harvest: How to Spot Perfect Ripeness
- 8. Elevating Your Summer Harvest
- 9. Frequently Asked Questions
- 9.1. Can I leave my pallet garden outdoors over the winter?
- 9.2. How many watermelon plants can I realistically grow in a single standard pallet?
- 9.3. Do I need to manually pollinate the flowers in a pallet garden?
- 9.4. Why is my watermelon cracking open while still on the vine?
- 9.5. Is it necessary to paint or seal the pallet before planting?
1 Simple Trick for Sweeter Homegrown Watermelons This Summer
There is something profoundly satisfying about slicing into a crisp, ice-cold watermelon that you grew completely from scratch in your own backyard. The explosive sweetness and refreshing juice offer the ultimate reward for a season spent out in the sun.
Unfortunately, for many urban homesteaders and residential gardeners, growing these iconic summer fruits feels like an impossible dream. Traditional watermelon patches require an immense amount of space, as sprawling vines quickly overtake entire lawns, suffocate neighboring vegetable beds, and create a chaotic, untamed landscape.
1 Simple Trick for Sweeter Homegrown Watermelons This Summer

If you are working with a small yard, a concrete patio, or simply want to keep your garden neat and manageable, there is a brilliant, space-saving solution you might have overlooked: pallet gardening. By repurposing a standard wooden shipping pallet, you can cultivate exceptionally sweet, juicy watermelons in a fraction of the space.
This vertical and elevated method solves nearly every common issue associated with growing melons, offering a practical and aesthetically pleasing alternative to traditional ground planting.
Why Wooden Pallets Transform Watermelon Growing
Watermelon plants are notoriously finicky when it comes to their growing environment. They crave intense heat and deep hydration, yet they are incredibly susceptible to root rot, fungal infections, and pest damage when left to sit on damp, compacted ground. Utilizing a wooden pallet addresses these vulnerabilities simultaneously.
Superior Drainage and Aeration
By raising the soil bed and allowing the vines to lift off the flat ground, the slatted design of a pallet ensures that excess water drains away rapidly. This prevents the soil from becoming waterlogged—a condition that quickly suffocates roots and invites destructive fungal pathogens like root rot. Furthermore, the elevated structure permits fresh air to circulate completely around the foliage and developing fruits, drastically reducing the risk of leaf-destroying mildew.
Enhanced Heat Retention
Watermelons thrive on warmth, particularly around their root zones. The dark soil held within the wooden frame of a pallet acts as a natural solar radiator, absorbing ambient heat from the sun and keeping the root system significantly warmer than surrounding native garden soil. This localized warmth accelerates early plant development and encourages a much sweeter fruit profiles as harvest approaches.
Protection from Common Ground Spoilage
When watermelons rest directly on wet backyard dirt, they frequently develop flat, yellowed spots, become easy targets for burrowing insects, and risk rotting from excessive moisture. Keeping the developing melons propped up on wooden slats or trellises eliminates ground contact altogether, resulting in perfectly symmetrical, unblemished, and healthier fruits.
How to Sourced and Safely Select Your Garden Pallet
Not every wooden pallet left behind a grocery store or commercial warehouse is safe for growing edible crops. Many industrial pallets are treated with harsh chemical preservatives to prevent insect infestations and wood decay during international shipping. Prioritizing safety means knowing exactly what markings to look for.
Deciphering International Pallet Stamps
Before bringing a pallet home, inspect its sides for an official International Plant Protection Convention (IPPC) stamp. This mark contains vital data regarding how the wood was treated:
Look for the “HT” Stamp: This indicates the pallet was Heat-Treated in a specialized kiln to eliminate pests. This process utilizes zero toxic chemicals, making the wood completely safe for organic vegetable and fruit production.
Avoid the “MB” Stamp: This signifies the pallet was treated with Methyl Bromide, a highly toxic chemical pesticide. Never use an MB-stamped pallet in or around your garden ecosystem.
Additionally, reject any pallets that feature strange chemical odors, deep oily stains, or evidence of heavy industrial spills. Once you find a clean, HT-stamped specimen, scrub it down with soapy water and lightly sand any rough edges to protect your hands and your plant’s fragile vines from splinters.
Top Watermelon Varieties Tailored for Compact Spaces
While a classic 25-pound heirloom watermelon isn’t a practical match for an elevated pallet setup, a wide variety of “icebox” and bush-style cultivars thrive beautifully in this configuration.
| Watermelon Variety | Days to Maturity | Distinctive Characteristics | Best For |
| Sugar Baby | 75–80 Days | Ultra-sweet, deep red flesh with a dark green rind. | Small balconies and maximum sweetness. |
| Crimson Sweet | 80–85 Days | Classic striped look, excellent disease resistance. | Traditional flavor lovers. |
| Bush Jubilee | 90 Days | Compact, structured vine habit bred for tight spaces. | High-yield container gardens. |
| Golden Midget | 70 Days | Rind turns bright gold when perfectly ripe; pale pink flesh. | Beginners who struggle with harvest timing. |
To guarantee the highest possible sugar concentration and maximize the overall flavor profile, limit each individual vine to just one or two developing fruits. This forces the plant to pour all of its energy and structural sugars into a select few melons rather than diluting its resources across too many fruits.
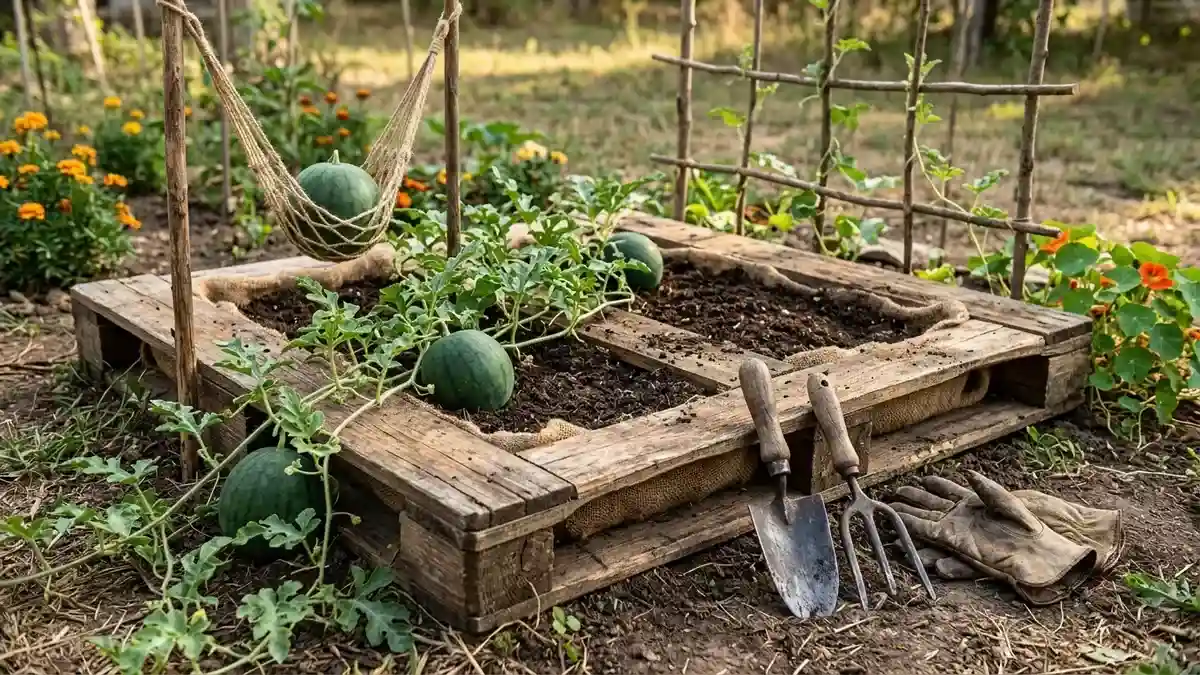
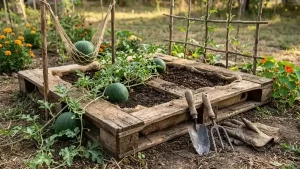
Setting Up Your Pallet Garden Step-by-Step
Transforming your prepared wooden structure into a thriving, high-yield growing station takes less than an hour when you follow a clear sequence.
Step 1: Install the Fabric Barrier
Lay your clean pallet flat on the ground. Cut a sheet of durable, heavy-duty landscape fabric or breathable weed cloth to fit the back, sides, and bottom of the frame. Staple the fabric securely along the internal wooden supports. This creates a secure, breathable pocket that holds your soil in place while allowing excess water to escape effortlessly.
Step 2: Mix and Pour Premium Soil
Flip the pallet over so the open slats face upward. Fill the internal cavities with a lightweight, nutrient-rich soil blend. Avoid heavy, unamended garden dirt from your yard. Instead, use a custom mix consisting of:
One part rich, organic compost
One part aerated loamy potting soil
One part moisture-balancing organic matter (such as peat moss or coco coir)
Step 3: Angle for Optimal Sunlight
Position your pallet in a spot that receives at least six to eight hours of direct, unfiltered sunlight daily. For the best results, prop one end of the pallet up slightly, creating a gentle angle facing south toward the sun. This slant improves water runoff and catches maximum solar radiation to warm the soil quickly.
Planting and Caring for Your Vines
Watermelons are native to warm tropical climates and have absolutely no tolerance for chilly weather. Wait until all threat of spring frost has completely passed and your local soil temperatures consistently register above 70°F (21°C) before introducing your seeds or young nursery seedlings to the pallet slots.
[ Pallet Structure ] ---> [ Gentle South-Facing Angle ] ---> [ Maximized Solar Heat ]
                                                                     |
[ Icebox Varieties ] <--- [ Deep Root Irrigation ]     <--- [ Deep Sweetness Focus ]
Smart Vertical and Trellis Support
As your watermelon vines begin to rapidly stretch, gently guide them out of the pallet slats. If you want to maximize your ground space, train the vines upward onto an adjacent vertical trellis or A-frame support structure using soft garden twine or flexible fabric ties.
When the tiny yellow flowers are pollinated and individual fruits grow to about the size of a baseball, their weight can easily snap the vine. To prevent this, construct simple DIY fruit hammocks using old mesh produce bags, pantyhose, or strips of soft cotton t-shirts. Cradle each developing melon in its own supportive sling and tie the ends securely to the pallet or trellis frame to take the physical strain off the plant.
Precise Watering Protocols
While watermelons require substantial moisture, they hate having constantly wet, muddy roots. Instead of giving them shallow daily splashes of water, practice deep, infrequent irrigation. Give the base of the plant a thorough, long drink every few days, allowing the top inch of soil to dry out slightly between waterings.
Important Pro-Tip: Always apply water directly to the soil at the base of the plant. Avoid wetting the leaves with overhead sprinklers, as damp foliage in the summer heat creates the perfect breeding ground for powdery mildew and devastating fungal blights.
The Flower Fertilizer Shift
When your watermelon plants are young and growing leaves, they benefit from standard balanced organic matter. However, the moment bright yellow blossoms begin to emerge, alter your nutrient regimen. Switch to a low-nitrogen, high-phosphorus fertilizer blend. Excessive nitrogen at this mature stage will force the plant to produce nothing but lush green leaves, while high phosphorus directly stimulates heavy flower production and bigger, sweeter melons.
Defending Against Pests and Diseases Naturally
A compact garden space can still fall victim to common garden invaders if you aren’t vigilant. Keep a sharp eye out for cucumber beetles, squash bugs, and destructive aphids.
To deter these pests without relying on harsh chemical sprays, apply a organic neem oil solution to the foliage during the early morning or late evening hours. Additionally, practice strategic companion planting by tucking vibrant marigolds or peppery nasturtiums into the open corners of your pallet; their natural aromatic oils serve as an excellent, chemical-free repellent against common garden insects.
Mastering the Harvest: How to Spot Perfect Ripeness
Harvesting a watermelon too early is a heartbreaking mistake because, unlike many other garden fruits, watermelons completely stop ripening the moment they are severed from the vine. To ensure your melon is at its absolute peak of sugar concentration and juiciness, look for three reliable indicators:
The Dried Tendril: Locate the curly green vine tendril positioned closest to where the fruit connects to the main stem. If it is green, the fruit is still growing. Once that specific tendril turns completely brown, dry, and shriveled, the melon is ready.
The Creamy Yellow Belly: Gently lift the melon and check its underside. The spot where the fruit rests against the wood should shift from a stark, bright white to a warm, rich, creamy yellow color.
The Hollow Thump: Give the center of the fruit a firm rap with your knuckles. A dull, metallic ping indicates under-ripeness, whereas a deep, low, hollow thud means the interior flesh is dense, fully hydrated, and packed with sweet juice.
For the absolute best culinary experience, harvest your melons in the early morning hours when their natural sugar levels are most concentrated, and chill them thoroughly in the refrigerator before slicing.
Elevating Your Summer Harvest
Embracing the pallet gardening method is a game-changer for space-conscious growers and backyard enthusiasts alike. By taking advantage of improved structural drainage, optimized solar heat retention, and vertical vine training, you can bypass the traditional challenges of ground rot and crowded yards. Select a safe, heat-treated pallet, choose a compact cultivar like Sugar Baby, and use supportive fruit hammocks to enjoy an incredibly abundant, unblemished, and wonderfully sweet harvest all summer long.
Frequently Asked Questions
Can I leave my pallet garden outdoors over the winter?
While the wooden pallet itself can survive the winter weather, watermelons are strict annual plants that will naturally die off at the first hard autumn freeze. After your final harvest, clear out the dead vines, top off the internal soil pockets with fresh compost, and cover the structure with a tarp or store it in a shed to preserve the wood for next spring.
How many watermelon plants can I realistically grow in a single standard pallet?
Because watermelons are heavy feeders that require plenty of root space, you should plant no more than two small-variety seedlings per standard 40×48-inch pallet. Overcrowding the structure will result in stunted root development and small, flavorless fruit.
Do I need to manually pollinate the flowers in a pallet garden?
If your garden is outdoors and visited regularly by local bees and butterflies, natural pollination will occur easily. However, if you are growing on a high-rise balcony or enclosed patio with low insect activity, you can manually pollinate by gently swirling a small, clean paintbrush inside a male blossom and transferring the pollen directly to the center of a female flower (identifiable by the miniature melon shape at the base of its petals).
Why is my watermelon cracking open while still on the vine?
Splitting or cracking is almost always caused by sudden, drastic fluctuations in your watering routine. If a watermelon plant goes through a prolonged dry spell and is then suddenly inundated with a massive amount of water, the interior flesh will expand far faster than the outer rind can stretch, causing it to burst. Maintain consistent, steady moisture to prevent this issue.
Is it necessary to paint or seal the pallet before planting?
It is not necessary, and it is generally safer to leave the wood completely natural. Many commercial paints, stains, and water-sealants contain volatile organic compounds (VOCs) and chemical solvents that can leach directly into your organic soil mix and be absorbed by your edible crops. Stick to raw, clean, heat-treated (HT) wood.