
Table of Contents
- 1. The Science of Capillary Action: How Wick Watering Works
- 2. Gathering Your DIY Self-Watering Supplies
- 3. Step-by-Step Guide to Assembling Your Vacation Watering System
- 3.1. Step 1: Position the Reservoir and Elevate It
- 3.2. Step 2: Measure and Cut Your Wicking Lines
- 3.3. Step 3: Prime the System
- 3.4. Step 4: Install the Wicks
- 3.5. Step 5: Top Off the Water
- 4. Pro-Tips for Long-Term Travel and Special Plant Needs
- 4.1. Managing Extended Trips (10 to 14 Days)
- 4.2. Handling Thirsty vs. Low-Water Plants
- 5. Why This Method Beats Commercial Plant Gadgets
- 6. Final Checklist Before You Lock the Door
- 7. Frequently Asked Questions
- 7.1. 1. Can I use this wick watering method for my outdoor container garden?
- 7.2. 2. What happens if the water reservoir runs completely dry while I am away?
- 7.3. 3. Can I add liquid plant food or fertilizer to the vacation water reservoir?
- 7.4. 4. How many plants can I safely connect to a single water bucket?
- 7.5. 5. Will this method cause root rot if left set up for too long?
How to Keep Your Houseplants Alive While on Vacation: The Ultimate DIY Guide
Heading out of town for a well-deserved vacation is incredibly exciting, but for plant lovers, it often comes with a side of anxiety. Leaving your beloved green companions behind can feel like a gamble, especially if you don’t have a reliable neighbor to pop in and water them.
Fortunately, you don’t have to return home to a collection of wilted leaves and bone-dry soil. With a simple, low-cost physics trick, you can build an automated self-watering system using items you already have in your kitchen cupboards. Known as the wick watering method, this clever DIY setup ensures your plants receive a slow, steady supply of hydration without any risk of root rot or drowning.
How to Keep Your Houseplants Alive While on Vacation The Ultimate DIY Guide
 Baking Soda Overuse Damages Houseplants
The Science of Capillary Action: How Wick Watering Works
The beauty of the wick watering system lies in its simplicity. It relies entirely on capillary action—the exact same physical process that plants use to draw water upward from their roots into their leaves.
When a absorbent, natural-fiber string connects a elevated water source to lower, dry soil, the water molecules naturally cling to the fiber and pull each other along the length of the string. The dry soil acts as a sponge, pulling moisture through the wick only when it needs it. It creates a self-regulating loop: as the plant drinks and evaporation occurs, the soil draws down more water, keeping the root zone perfectly damp but never waterlogged.
Gathering Your DIY Self-Watering Supplies
Before you begin assembling your vacation watering system, you will need to gather a few basic household items.
A Massive Reservoir: A large, deep container capable of holding water. A 1- to 2-gallon stockpot, a heavy mixing bowl, or a clean plastic bucket works perfectly.
Natural-Fiber Wicks: Thick cotton string, 100% wool yarn, or cotton shoelaces cut into lengths of 12 to 24 inches.
An Elevation Platform: A sturdy stool, a small side table, or an inverted crate standing roughly 12 to 18 inches tall.
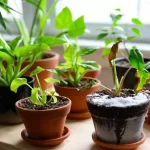
Your Plant Collection: Gather the potted houseplants that require consistent moisture while you are away.
Important Note on Materials: Avoid nylon, polyester, or any other synthetic paracords. Synthetic fibers are hydrophobic, meaning they repel water rather than absorbing it, and they will completely fail to transport moisture to your plants.
Step-by-Step Guide to Assembling Your Vacation Watering System
Setting up this system takes less than fifteen minutes. Follow these simple steps a day or two before your departure to guarantee your plants stay fully hydrated.
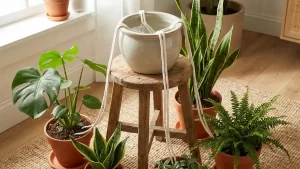
Step 1: Position the Reservoir and Elevate It
Place your chosen elevation platform (like a stool or chair) in a central location that receives indirect sunlight. Put your large water container right on top of it. Group your houseplants on the floor or a lower surface directly around the base of the stand.
     [ Elevated Water Reservoir ]
          │              │
     (Cotton Wick)   (Cotton Wick)
          │              │
          ▼              ▼
     [Plant Pot 1]   [Plant Pot 2]
To make sure gravity can assist the capillary action, the bottom of your water reservoir must sit at least 12 inches higher than the rims of the surrounding plant pots.
Step 2: Measure and Cut Your Wicking Lines
Measure the distance from the very bottom of your elevated water pot down into the dirt of each individual plant. Cut a piece of cotton string for each pot, making sure to add an extra 3 inches of slack to ensure the line can sit deeply within the soil.
Step 3: Prime the System
Drop your cut cotton strings into a bowl of water and let them soak completely for a minute or two. Squeeze out the excess, but make sure they remain thoroughly damp. Pre-soaking the wicks is a critical step; it removes trapped air pockets within the fibers and instantly jumpstarts the capillary flow.
Step 4: Install the Wicks
Submerge one end of the wet string all the way to the very bottom of your elevated water reservoir. Take the opposite end of the string and press it 2 to 3 inches deep into the soil of your houseplant, right near the base of the stem. Gently press the surrounding dirt down around the string to secure it firmly in place and ensure maximum contact between the soil and the fiber.
Step 5: Top Off the Water
Fill your central reservoir all the way to the brim with fresh, room-temperature water. Double-check that every single line is taut, fully submerged at the source, and securely buried in the dirt of its corresponding container. Your vacation system is now fully operational!
Pro-Tips for Long-Term Travel and Special Plant Needs
While a standard setup works beautifully for a 5- to 7-day trip, longer vacations or specific plant varieties require a few slight adjustments to ensure absolute success.
Managing Extended Trips (10 to 14 Days)
If you plan to be away for up to two weeks, swap out your kitchen mixing bowl for a massive 5-gallon utility bucket to ensure the water source doesn’t run dry. To minimize evaporation from the open container itself, stretch a piece of plastic cling wrap over the top of the bucket, poking small holes through the plastic to feed your cotton strings through.
Handling Thirsty vs. Low-Water Plants
Not all indoor plants drink at the same rate. Tailor your wicking system to accommodate the specific hydration needs of your collection:
| Plant Type | Watering Need | Wick Configuration |
| Tropicals (Ferns, Peace Lilies, Calatheas) | High / Consistent | Double up! Run two cotton strings to the pot |
| Standard (Pothos, Philodendrons, Monsteras) | Moderate | One standard cotton string or thick shoelace |
| Succulents & Cacti (Snake Plants, Jade) | Extremely Low | Do not wick. Water deeply before leaving instead |
Why This Method Beats Commercial Plant Gadgets
While garden centers sell various vacation watering tools—such as glass watering globes or terracotta stakes—the DIY wick system is often vastly superior for several reasons:
No Risk of Shard Damage: Glass globes can easily crack, and heavy terracotta stakes can break delicate root systems when pushed into tight pots.
Controlled Delivery: Watering globes dump all of their contents into the soil within 24 to 48 hours, often flooding the roots and leaving the plant dry for the remainder of your trip. Wick watering delivers a true slow-drip system over weeks.
Scalable and Cost-Efficient: Instead of buying twenty separate gadgets for twenty plants, a single central stockpot can support half a dozen houseplants simultaneously for pennies.
Final Checklist Before You Lock the Door
To give yourself absolute peace of mind while traveling, run through this quick checklist before heading out:
Conduct a Trial Run: Set up your wick system 48 hours before you leave. This allows you to monitor the water level and verify that the soil in each pot is staying damp but not swampy.
Pull Plants Out of Direct Sun: Move your plants a few feet away from bright, hot windows. Lower light levels reduce the plant’s metabolic rate, causing them to drink significantly less water while you are away.
Group Pots Together: Clustering your plants closely around the elevated water source naturally raises the localized humidity, preventing the soil from drying out too quickly.
With a simple bucket of water, a bundle of cotton string, and a tiny bit of preparation, you can head off on your adventures completely stress-free, knowing you will return home to vibrant, thriving greenery.
Frequently Asked Questions
1. Can I use this wick watering method for my outdoor container garden?
Yes, but with caution. Outdoor planters dry out significantly faster than indoor plants due to wind, high temperatures, and direct sunlight. If you use this method outside on a porch or balcony, you will need a much larger water reservoir (like a heavy-duty trash can) and thicker wicks, and you should move the pots into full shade for the duration of your trip.
2. What happens if the water reservoir runs completely dry while I am away?
If the reservoir empties, the cotton wicks will dry out, and the capillary action will stop. Once a wick dries completely, it cannot restart on its own, even if a rainstorm fills the bucket back up. Always use a larger container than you think you need to ensure it lasts until you return.
3. Can I add liquid plant food or fertilizer to the vacation water reservoir?
It is not recommended. As water evaporates from the lines and soil, fertilizer salts can become highly concentrated within the cotton fibers, clogging the wick and potentially burning the plant’s roots. Feed your plants a week prior to your trip, and stick to pure, clean water for the vacation reservoir.
4. How many plants can I safely connect to a single water bucket?
You can connect as many plants as can physically fit around the perimeter of your elevation stand, provided the reservoir holds enough volume to sustain them all. For a typical 2-gallon pot, 4 to 6 small-to-medium houseplants is a safe, manageable number.
5. Will this method cause root rot if left set up for too long?
For moisture-loving tropical plants, this setup can be maintained for weeks without issue. However, for most common houseplants, keeping the soil continuously damp over months can eventually restrict oxygen to the roots, leading to rot. Use this strictly as a temporary vacation solution rather than a permanent everyday watering method.