Table of Contents
- 1. The Postural Core Shift: Why Standing Ab Workouts Are Superior for Trimming Your Waistline
- 2. The Biomechanics: Standing vs. Floor Core Training
- 3. The 30-Day Standing Ab Blueprint: 6 Essential Exercises
- 3.1. 1. Standing Wood Chop (Functional Rotation)
- 3.2. 2. Standing Oblique Reach (Side Definition)
- 3.3. 3. Standing Knee-to-Elbow Twist (Deep Stabilization)
- 3.4. 4. Standing Side Crunch (Lateral Compression)
- 3.5. 5. Standing March with Twist (Cardio-Core Burner)
- 3.6. 6. Standing Side Leg Raise with Reach (Hip & Oblilque Balance)
- 4. What to Expect: The 30-Day Progress Timeline
- 5. Conclusion
- 6. Frequently Asked Questions
- 6.1. Can you truly lose a belly pooch completely in 30 days?
- 6.2. Is it normal to feel this routine working in the lower back?
- 6.3. Can individuals with severe balance issues perform these standing exercises?
- 6.4. Why do standing ab exercises burn more calories than floor crunches?
- 6.5. How many times a week should I perform this standing ab routine?
The Postural Core Shift: Why Standing Ab Workouts Are Superior for Trimming Your Waistline
Shedding a stubborn lower belly pooch can often feel like an impossible fitness battle. The traditional response to midsection toning usually involves dropping to the gym floor for endless, grueling sets of sit-ups, crunches, and planks. However, many individuals find that floor exercises put immense, painful strain on their necks and lower backs without ever yielding the flat stomach they are working for.
Fortunately, you do not need to lie on the floor to sculpt a firm midsection. According to elite personal trainer Tyler Read, switching to a dedicated standing ab routine can deliver visible results in as little as 30 days.
When you train your core while standing upright, your deep stabilizing muscles are forced to fire continuously just to keep you balanced against gravity. This constant, functional engagement burns significantly more calories than isolated floor crunches, improves your standing posture, and targets the deep abdominal walls to flatten a belly pooch safely and effectively.

The Postural Core Shift Why Standing Ab Workouts Are Superior for Trimming Your Waistline

The Biomechanics: Standing vs. Floor Core Training
To understand why standing exercises are highly efficient, it helps to look at the structural design of your abdominal wall. Your core is not a single muscle; it is a complex, three-dimensional brace consisting of the rectus abdominis (six-pack muscle), the obliques (side waist muscles), and the deep transversus abdominis (your body’s internal corset).
[Floor Crunch]   ➔ Isolate front muscle layer ➔ High spine strain  ➔ Low calorie burn
[Standing Move]  ➔ Engages full 3D core brace ➔ Protects the back ➔ High calorie burn + Balance
Floor crunches only flex your spine forward, targeting a single plane of motion. Standing exercises, conversely, require your core to twist, brace, and stabilize your entire body weight across multiple planes. This full-body recruitment elevates your heart rate—turning your ab workout into a light cardiovascular session—while systematically pulling your stomach flat and relieving pressure on your lumbar spine.
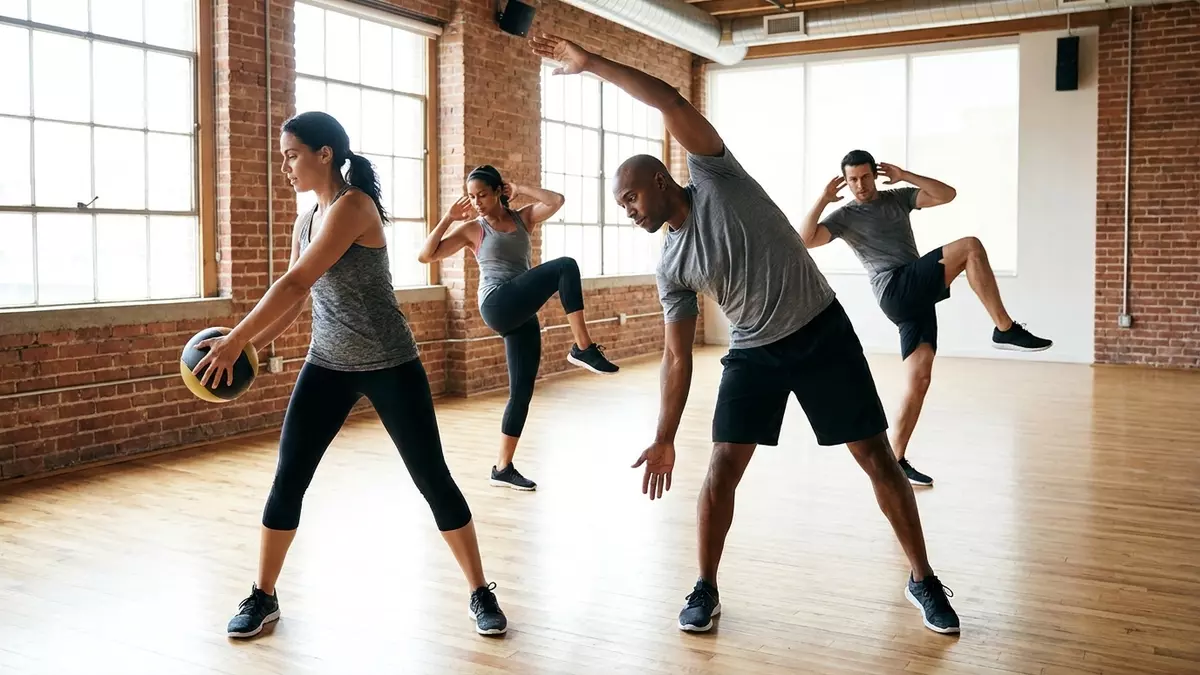
The 30-Day Standing Ab Blueprint: 6 Essential Exercises
For maximum results, perform 12 to 15 controlled repetitions of each exercise sequentially. Focus entirely on maintaining a straight spine and keeping your belly button pulled tightly toward your backbone throughout every movement.

1. Standing Wood Chop (Functional Rotation)
The Movement: Hold a light weight, medicine ball, or water bottle with both hands. Extend your arms diagonally above your right shoulder. Pivot your feet and chop the weight down and across your body toward your left hip in a smooth, diagonal slicing motion. Return to the top slowly. Complete your reps, then switch sides.
The Target: This dynamic twisting motion forces your upper abs, lower abs, and side obliques to fire together, mimicking real-world lifting patterns to trim the waistline.
2. Standing Oblique Reach (Side Definition)
The Movement: Stand tall with your feet slightly wider than hip-width apart. Extend your right arm straight up overhead. Slowly lean your entire torso directly to the left, reaching your right hand over your head while sliding your left hand down your left thigh. Contract your side muscles to pull yourself back to center.
The Target: This elongates and deepens the contraction along the sides of your torso, actively tightening the obliques and carving out lateral waist definition.
3. Standing Knee-to-Elbow Twist (Deep Stabilization)
The Movement: Place your fingertips lightly behind your ears with your elbows flared out wide. Drive your right knee up toward your chest while simultaneously rotating your torso to bring your left elbow down to meet it. Touch them together at belly level, return to the start, and alternate sides.
   ( Left Elbow ) ───➘
                        [ Deep Core Crunch ]
   ( Right Knee ) ───➚
The Target: This cross-body movement demands high structural balance and coordination, activating the deep transversus abdominis layers while keeping your lower back safe.
4. Standing Side Crunch (Lateral Compression)
The Movement: Keep your hands behind your head. Shift your weight onto your left leg. Lift your right leg straight out to the side with your knee bent, bringing your outer thigh up toward your right elbow. Crunch your torso sideways to squeeze your hip and elbow together, then lower under control.
The Target: This operates exactly like a side floor crunch but removes all neck strain, compressing the upper obliques and lower abs perfectly.
5. Standing March with Twist (Cardio-Core Burner)
The Movement: Begin marching in place with a steady, rhythmic bounce, driving your knees up to hip height. As each knee rises, forcefully twist your shoulders and ribcage across your body toward the elevated leg.
The Target: The continuous marching cadence accelerates your heart rate, transforming the movement into a calorie-burning cardio session while keeping the core under perpetual tension.
6. Standing Side Leg Raise with Reach (Hip & Oblilque Balance)
The Movement: Extend your right arm straight up into the air. Keeping your leg completely straight, raise your right leg directly out to the side while sweeping your right arm down, attempting to touch your toes or shin at hip height. Maintain a perfectly upright posture; do not lean forward.
The Target: This advanced move blends single-leg balance, lateral hip strength, and intense oblique activation to bulletproof the lower back and tighten the lower belly.
What to Expect: The 30-Day Progress Timeline
Sticking with this standing routine consistently over a single month will transform your midsection in distinct, predictable phases:
Days 1 to 10 (The Awakening): Your deep internal core muscles will feel noticeably tighter throughout the day. You will experience a rapid improvement in your baseline balance, and standing up straight will start to feel natural and effortless.
Days 11 to 20 (The Definition): As your HPA-axis stays calm and caloric expenditure remains high, structural fluid retention drops. Your waistline will begin to look visibly more narrow, and your side obliques will show clearer definition.
Days 21 to 30 (The Flattening): By the 30-day mark, the stubborn lower belly pooch is visibly smaller and pulled tightly inward. Your posture will be significantly straighter, and your deep abdominal wall will remain automatically braced and engaged during normal daily tasks without you ever having to think about it.
Conclusion
Losing a lower belly pooch does not require you to punish your spine on a hard gym mat. By standing tall and integrating Tyler Read’s personal trainer-approved routine into your weekly habits, you work with your body’s natural anatomy. You will burn more calories, protect your joints from strain, and sculpt a firm, functionally strong midsection that supports your health and confidence for decades to come.
Frequently Asked Questions
Can you truly lose a belly pooch completely in 30 days?
Within 30 days of consistent training, you can significantly reduce the appearance of a belly pooch by strengthening your deep transversus abdominis muscle (your body’s natural internal corset). Tightening this muscle pulls your internal organs inward, flattening your stomach and fixing structural postural slouching. However, permanently losing actual fat tissue requires pairing this movement routine with a clean, nutrient-dense diet over time.
Is it normal to feel this routine working in the lower back?
If you feel a light, muscular fatigue in your lower back, it is completely normal. Your lower back muscles comprise the posterior side of your core brace and must work hard to keep you balanced while standing. However, if you experience a sharp, pinching, or shooting joint pain in your spine, you are likely over-extending your back. Pause the workout and focus on keeping your tailbone tucked slightly under.
Can individuals with severe balance issues perform these standing exercises?
Absolutely. If your balance feels shaky or you are worried about slipping, you can easily adapt this entire routine for safety. Simply stand next to a sturdy kitchen counter, a solid wall, or a heavy chair. Keep one hand firmly on the support surface for stability while executing the twisting and lifting movements with the opposite side of your body.
Why do standing ab exercises burn more calories than floor crunches?
Floor crunches are isolated movements that only recruit a tiny fraction of muscle tissue in your upper abdomen. Standing exercises require your massive leg muscles, glutes, lower back, and deep core stabilizers to work simultaneously just to hold you upright against gravity. This massive collective muscle recruitment demands significantly more oxygen and metabolic energy, driving up your total caloric burn.
How many times a week should I perform this standing ab routine?
Because these standing exercises utilize your natural body weight and avoid overloading your joints with heavy weights, this routine is incredibly safe and gentle on the body. For optimal muscular adaptation and rapid postural improvements, you can safely practice this 10-minute routine 4 to 5 times per week, leaving one or two days for complete rest and recovery.