Table of Contents
- 1. Why Stones and Rocks Become Breeding Grounds for Weeds
- 1.1. The Microscopic Soil Factory
- 1.2. Broken Barriers and Stubborn Roots
- 2. A Detailed Plan to Eradicate Rock Bed Weeds
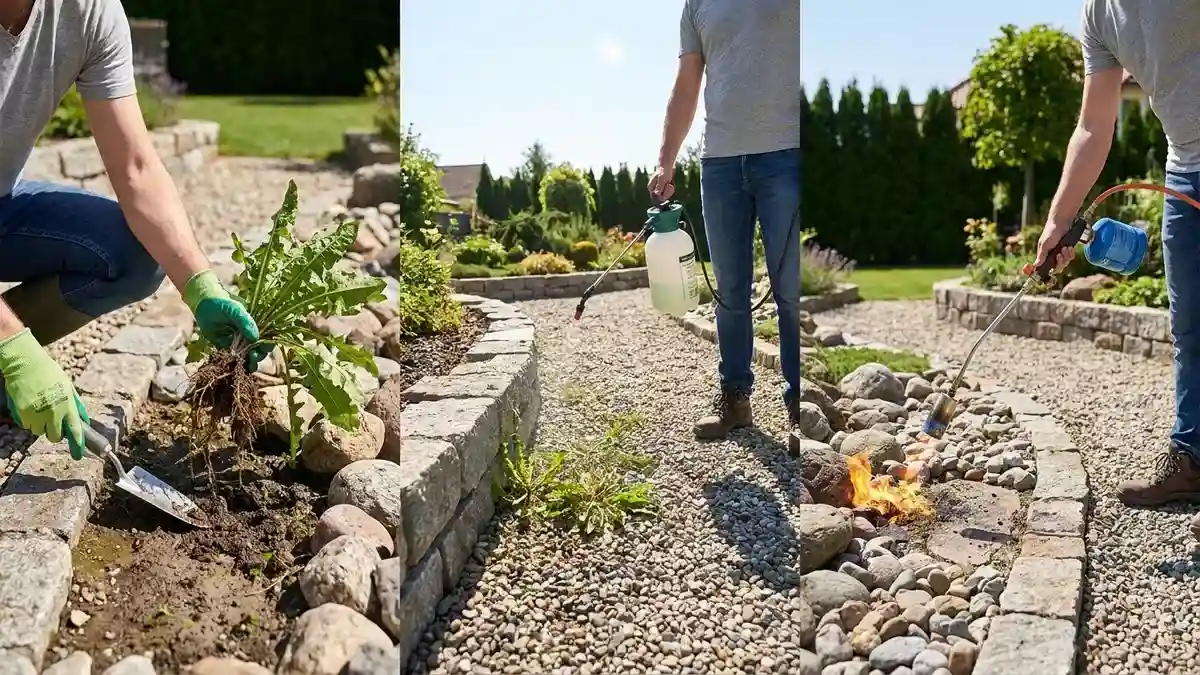
- 2.1. 1. Manual Root Extraction
- 2.2. 2. The Powerful Homegrown Vinegar Spray
- 2.3. 3. Thermal Eradication with a Weed Torch
- 3. Long-Term Maintenance: Keeping Your Stones Clear
- 3.1. Clear Out Accumulated Debris
- 3.2. Upgrade to Commercial-Grade Fabric
- 3.3. Maintain a Year-Round Schedule
- 4. Pros and Cons of Common Stone-Weeding Strategies
- 5. Frequently Asked Questions
- 5.1. Will the salt in the homemade vinegar spray ruin my yard permanently?
- 5.2. Can I just use boiling water to clear weeds out of my gravel path?
- 5.3. How deep should my layer of landscape rocks be to prevent growth?
- 5.4. Why do weeds keep growing on top of my brand-new landscape fabric?
- 5.5. What is the best way to secure landscape fabric so weeds don’t sneak through?
3 Smart Tactics to Eliminate Unwanted Garden Weeds Permanently
Few things disrupt a beautifully manicured backyard quite like a sudden invasion of unsightly weeds. They push through every microscopic opening in your decorative stone borders, winding gravel paths, and rock gardens. You spend your valuable weekend hours bending over, pulling them out, and perhaps venting some frustration under your breath, only to find them thriving in the exact same spot a week later.
If this cycle sounds incredibly familiar, you are certainly not alone. Keeping rocky landscapes pristine can feel like an endless chore. Fortunately, you do not have to concede defeat to these persistent garden intruders. By using the right approach, a few everyday household ingredients, and some highly strategic preventative habits, you can take back your yard and enjoy a clean, low-maintenance stone landscape for good.

3 Smart Tactics to Eliminate Unwanted Garden Weeds Permanently
Why Stones and Rocks Become Breeding Grounds for Weeds
It seems completely backward that fragile plant life can flourish in a bed of dense, heavy stones. However, rocky areas actually provide a surprisingly cozy environment for opportunistic seeds to settle and grow.
The Microscopic Soil Factory
Over several seasons, your rock beds collect a variety of airborne debris. Fine dust particles, falling autumn leaves, windblown pollen, and decaying organic mulch settle down into the small crevices between the stones. As this organic debris breaks down, it creates a rich, highly moisture-retentive base right beneath the rocks. This underground layer essentially acts as a hidden compost blanket, giving seeds everything they need to sprout.
Broken Barriers and Stubborn Roots
Many homeowners invest in landscape fabric beneath their gravel, assuming it offers a lifetime of protection. Unfortunately, even the best underlayment can tear, shift, or degrade after years of exposure to soil movement and weather. Once a tiny hole opens up, roots aggressively dive through to anchor themselves. Compounding the issue, the heavy weight of the surrounding stones secures the weeds in place, making them incredibly difficult to pull cleanly without breaking the stem.

A Detailed Plan to Eradicate Rock Bed Weeds
To clean out your rock features effectively, you need a multi-layered attack strategy that addresses both the visible plant and the hidden root network beneath the surface.
1. Manual Root Extraction
While it is incredibly tempting to just yank off the leafy green tops of the plants to tidy up the yard quickly, this shortcut guarantees a return performance. Leaving the root structure completely intact means aggressive perennial weeds like thistles and crabgrass will regenerate rapidly.
The Right Technique: Use a narrow garden trowel, a specialized weeding knife, or a hand-weeder to dig down beneath the stone layer. Grasp the weed firmly at its very base, right where the stem meets the dirt, and use a slow, steady upward pulling motion to draw out the entire taproot structure.
Pro Tip for Easy Pulling: Plan your hand-weeding sessions shortly after a heavy rainstorm, or give the rock bed a thorough soaking with your garden hose beforehand. Saturated soil loosens its grip on complex root networks, allowing you to slide the weeds out smoothly without breaking them off.

2. The Powerful Homegrown Vinegar Spray
If you want to avoid synthetic chemical herbicides that can linger in the environment or pose a risk to local wildlife, you can easily mix up a highly effective, natural alternative using standard household items found right in your kitchen pantry.
The Ultimate Natural Formula: Combine 1 gallon of standard white vinegar, 1 cup of table salt, and 1 tablespoon of liquid dish soap in a heavy-duty pump sprayer.
How it Destroys Weeds: The intense acidity of the vinegar quickly strips away the protective, waxy outer layer of the weed’s leaves. The salt pulls critical hydration completely out of the plant’s vascular network, while the dish soap serves as a surfactant, ensuring the liquid coats and clings to the slick foliage instead of instantly running off into the rocks.
Smart Application: For the absolute best results, spray this mixture during the middle of a hot, cloudless, sun-drenched day. The bright heat works in tandem with the spray to dehydrate and scorch the weeds within a few hours. Just remember that this solution is entirely non-selective; it will severely damage or kill any prize flowers, shrubs, or lawn grass it touches, so make sure to aim your spray nozzle with precision.
3. Thermal Eradication with a Weed Torch
For extensive stone patios, long gravel driveways, or expansive rock features where hand-pulling is physically overwhelming, a propane-powered weed torch offers an incredibly fast and chemical-free alternative.
These tools apply extreme heat directly to the unwanted vegetation. You do not actually need to burn the plants until they turn to ash; simply passing the flame over the leaves for a split second instantly boils the water stored within the plant’s cellular structure. This causes the cell walls to rupture immediately, cutting off the weed’s life support system and causing it to wither away to the root within 24 hours. Always exercise great care when operating a torch near dried wood mulch, plastic edging, wooden privacy fences, or dry summer grass.
Long-Term Maintenance: Keeping Your Stones Clear
Once you have eradicated the active invaders, you must alter the underlying environment to make sure that newly drifted seeds cannot establish a foothold in the future.
Clear Out Accumulated Debris
Regularly clear your stone features to remove the organic matter that serves as a seedbed. Use a heavy-duty outdoor shop-vacuum or a stiff-tined rake to pull out decaying leaves, silt, and broken-down twigs from between the gaps. Keeping the stones clean prevents the formation of that hidden dirt layer.
Upgrade to Commercial-Grade Fabric
If your existing weed barrier is old, thin, or falling apart, push the stones aside and install a heavy-duty, woven commercial-grade landscape fabric. Avoid flimsy, cheap plastic options. High-quality woven textiles are specifically engineered to block out all light while still allowing rain and air to pass through cleanly, preventing pooling water.
Maintain a Year-Round Schedule
Controlling weeds is a continuous practice rather than a single weekend project. Spend just a few minutes every week inspecting your stone features. Pay very close attention to your yard after heavy windstorms or severe downpours, as these weather events naturally wash in fresh debris and rogue seeds. Catching small sprouts early saves your back and your sanity over the long term.
Pros and Cons of Common Stone-Weeding Strategies
| Eradication Method | Main Advantages | Key Considerations |
| Manual Pulling | Completely free; entirely eco-friendly; removes the root system immediately. | Highly labor-intensive; requires significant physical bending and kneeling. |
| DIY Vinegar & Salt Mixture | Very cheap to make; utilizes non-toxic household items; rapid results. | Can negatively impact soil health if oversaturated; non-selective to plants. |
| Propane Thermal Torch | Fast coverage for large gravel paths; no chemical runoff; highly satisfying. | Requires purchasing propane canisters; can be a fire hazard in dry conditions. |
Frequently Asked Questions
Will the salt in the homemade vinegar spray ruin my yard permanently?
Salt does not break down or evaporate out of the earth easily. If you repeatedly soak the exact same spot with a high-salt mixture, you will create a localized zone where no vegetation can grow for an extended period. This is fantastic for dedicated stone driveways or walkways, but you should avoid using salt-heavy mixtures near the root zones of prized landscaping trees, ornamental shrubs, or perennial flower beds.
Can I just use boiling water to clear weeds out of my gravel path?
Absolutely. Pouring boiling water directly over small patches of weeds is an incredibly simple, free, and completely green way to scald them. The extreme temperature shocks the plant tissue and kills the foliage quickly. However, transporting heavy pots of boiling water across a large yard can be a safety hazard, and it will not stop new windblown seeds from sprouting a few weeks later.
How deep should my layer of landscape rocks be to prevent growth?
To effectively block out sunlight and prevent underlying seeds from gathering energy, maintain your decorative rock or gravel layer at a depth of at least 2 to 3 inches. Any thinner, and sunlight will easily penetrate the gaps, triggering seed germination.
Why do weeds keep growing on top of my brand-new landscape fabric?
When weeds grow on top of new fabric, it is because wind and rain have deposited dust and organic material into the rocky layers above the barrier. Seeds land in this newly formed sediment and grow downward. Regular cleaning with a leaf blower or shop-vac will prevent this top-layer accumulation.
What is the best way to secure landscape fabric so weeds don’t sneak through?
When laying down new fabric rows, make sure to overlap the edges by at least 6 inches to eliminate gaps. Secure the material firmly to the ground using heavy-duty metallic landscape staples placed every 2 to 3 feet along the seams, preventing the edges from curling up over time.